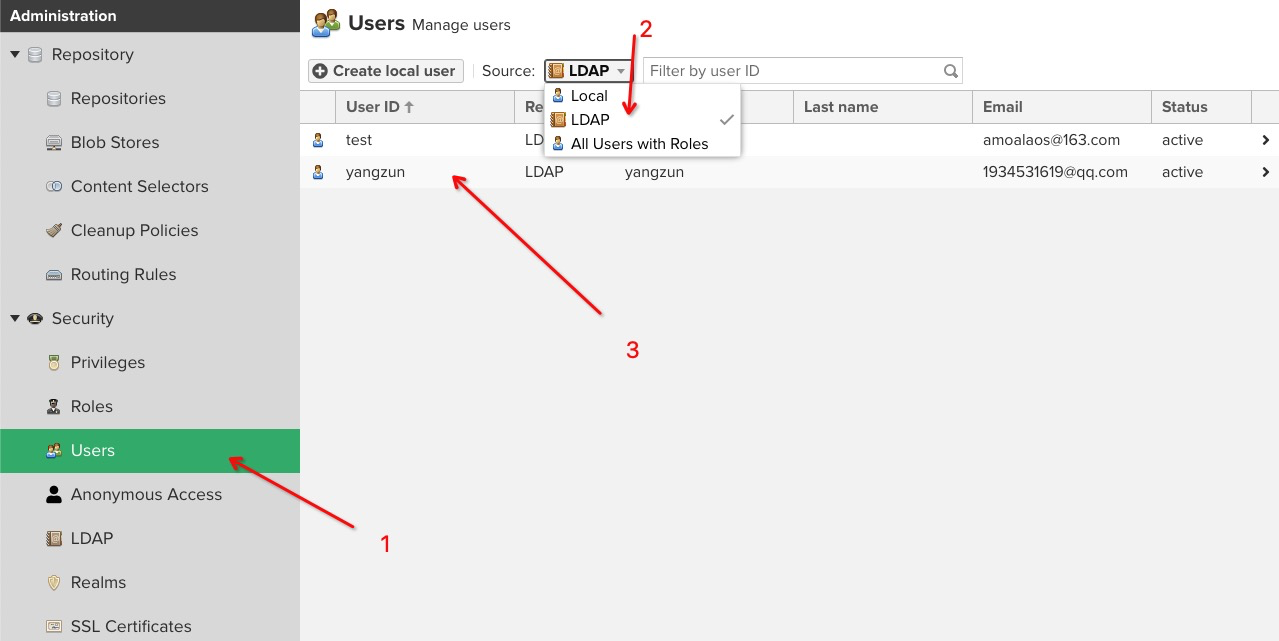
环境说明:
使用 docker-compose 部署 ldap
创建部署前所需的文件夹
1
|
mkdir -p /data/openldap/{data,config}
|
Docker-compose 部署
 1
 2
 3
 4
 5
 6
 7
 8
 9
10
11
12
13
14
15
16
17
18
19
20
21
22
23
24
25
26
27
28
29
|
cat > docker-compose.yaml << EOF
version: "2"
services:
  openldap:
    container_name: "openldap"
    image: "osixia/openldap:latest"
    restart: always
    environment:
      LDAP_ORGANISATION: "openldap"
      LDAP_DOMAIN: "treesir.pub"
      LDAP_ADMIN_PASSWORD: "123456"
      LDAP_CONFIG_PASSWORD: "123456"
    volumes:
      - /data/openldap/data:/var/lib/ldap
      - /data/openldap/config:/etc/ldap/slapd.d
    ports:
      - '389:389'
  phpldapadmin:
    container_name: "phpldapadmin"
    image: "osixia/phpldapadmin:latest"
    restart: always
    links:
      - "openldap"
    environment:
      PHPLDAPADMIN_HTTPS: "false"
      PHPLDAPADMIN_LDAP_HOSTS: "openldap"
    ports:
      - '30004:80'
EOF
|
docker-compose 启动
openLdap 目录结构的初始化
下面演示的的目录结构的创建,不一定适用于你们的环境,更具实际使用情况调整即可。
创建 users ou 组


创建 groups ou 组
与 上面 创建 users ou 组一样的
此时我们得到两个 ou组了,在接着创建 user & group

创建 user 用户对象


选择创建 defuault 对象,这样的 好处 是我们可以自定义字段,将无用的字段进行排除 只保留有效的字段。。
找到 inetOrgPerson , 点击 Proceed


创建完成后选择提交,如果提交 没有任何响应,将最上面的对象设置为 cn

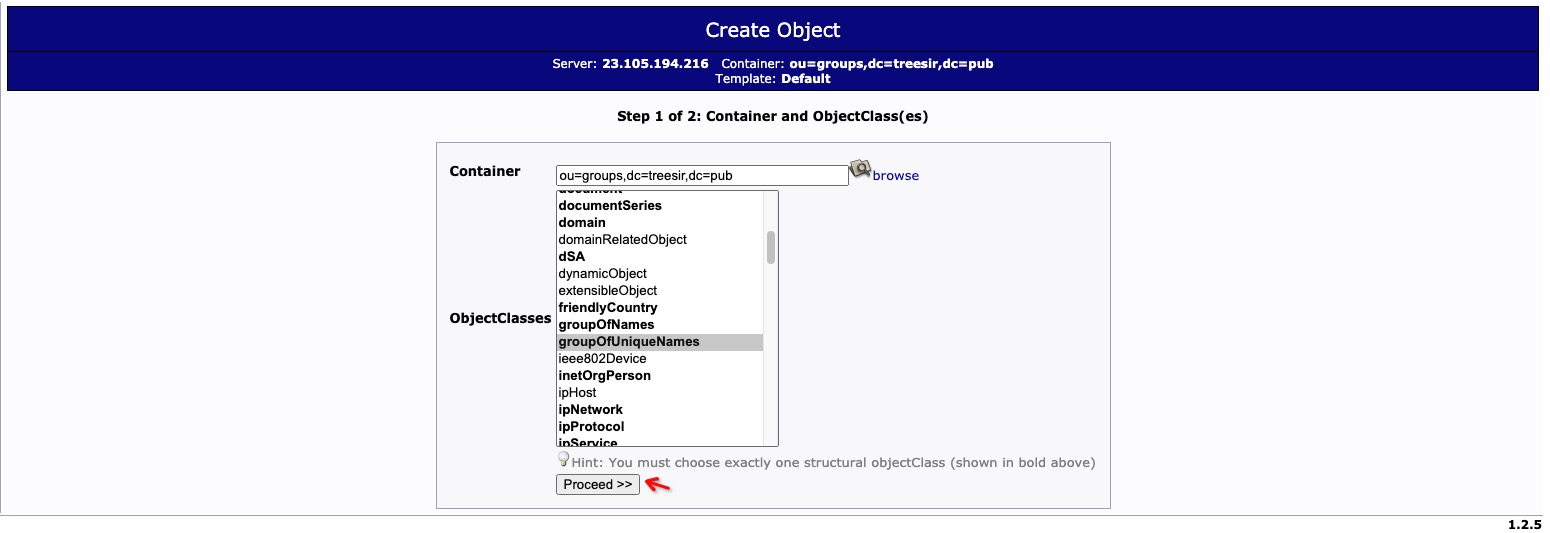
创建 group 组对象,并将 用户拉入这个组中

和上面一样,创建 default 对象

找到 groupOfUniqueNames 点击创建
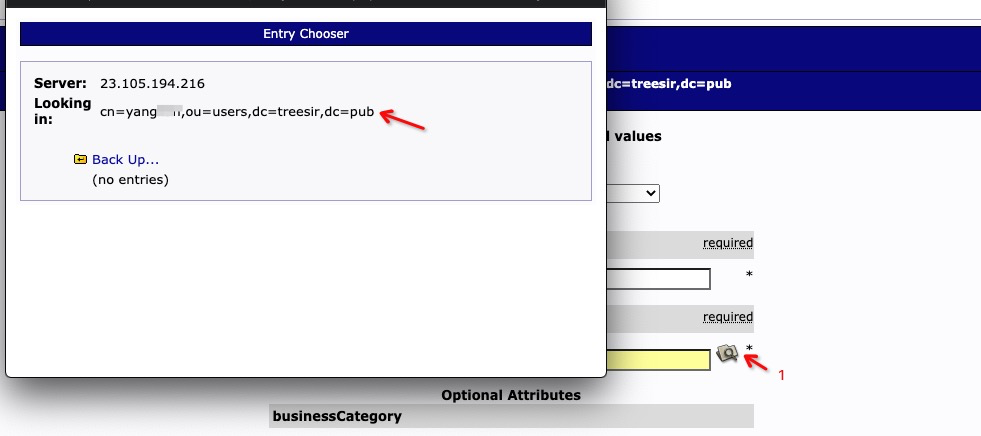
复制用户的信息,粘贴至 uniqueMember 中

其他字段留空,点击并提交。

如需添加其他用户至这个组
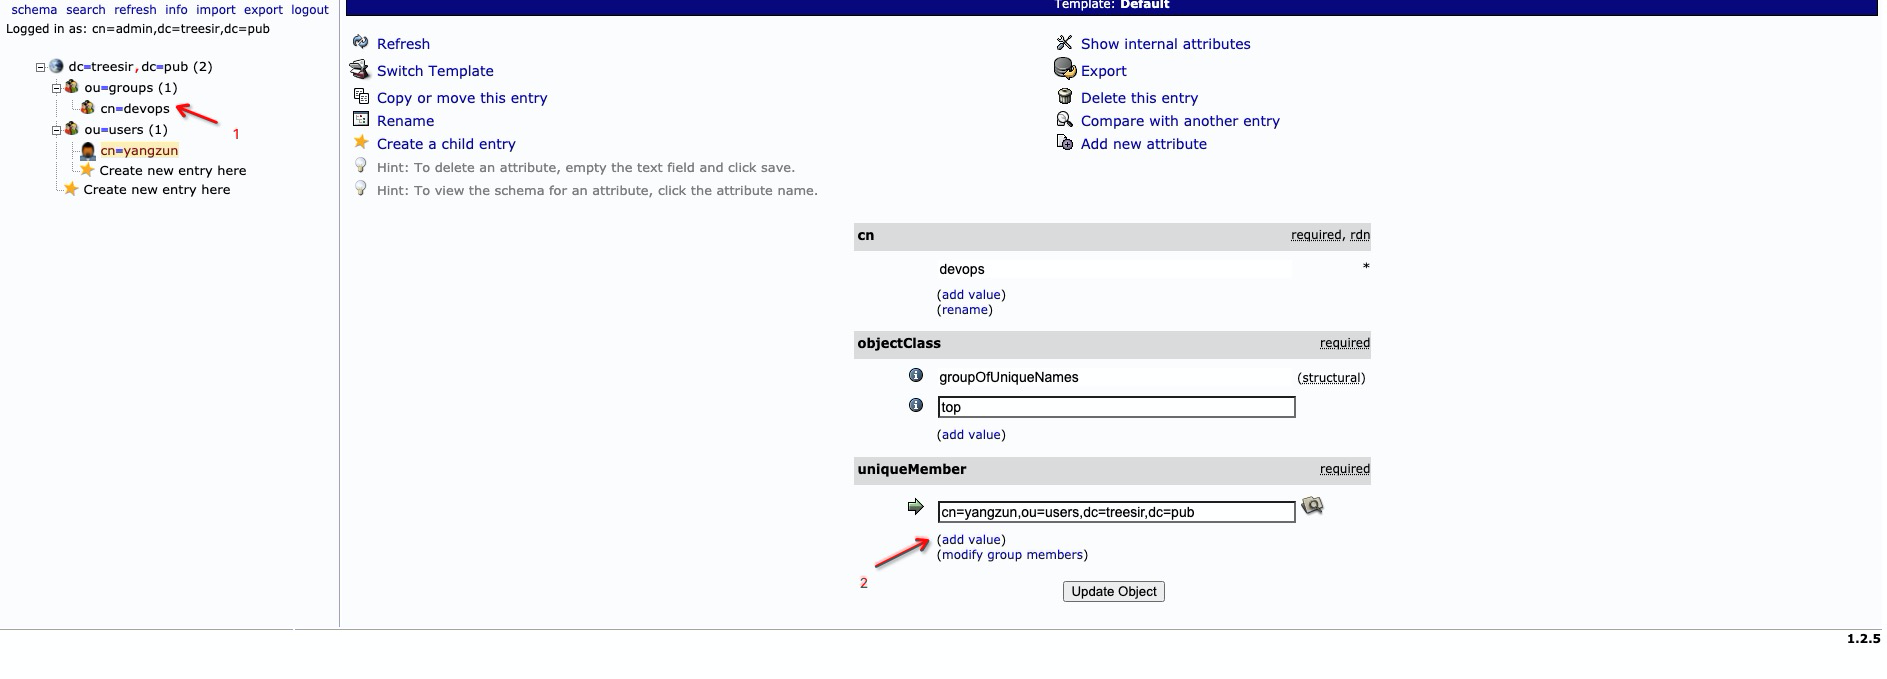
openLdap 优化
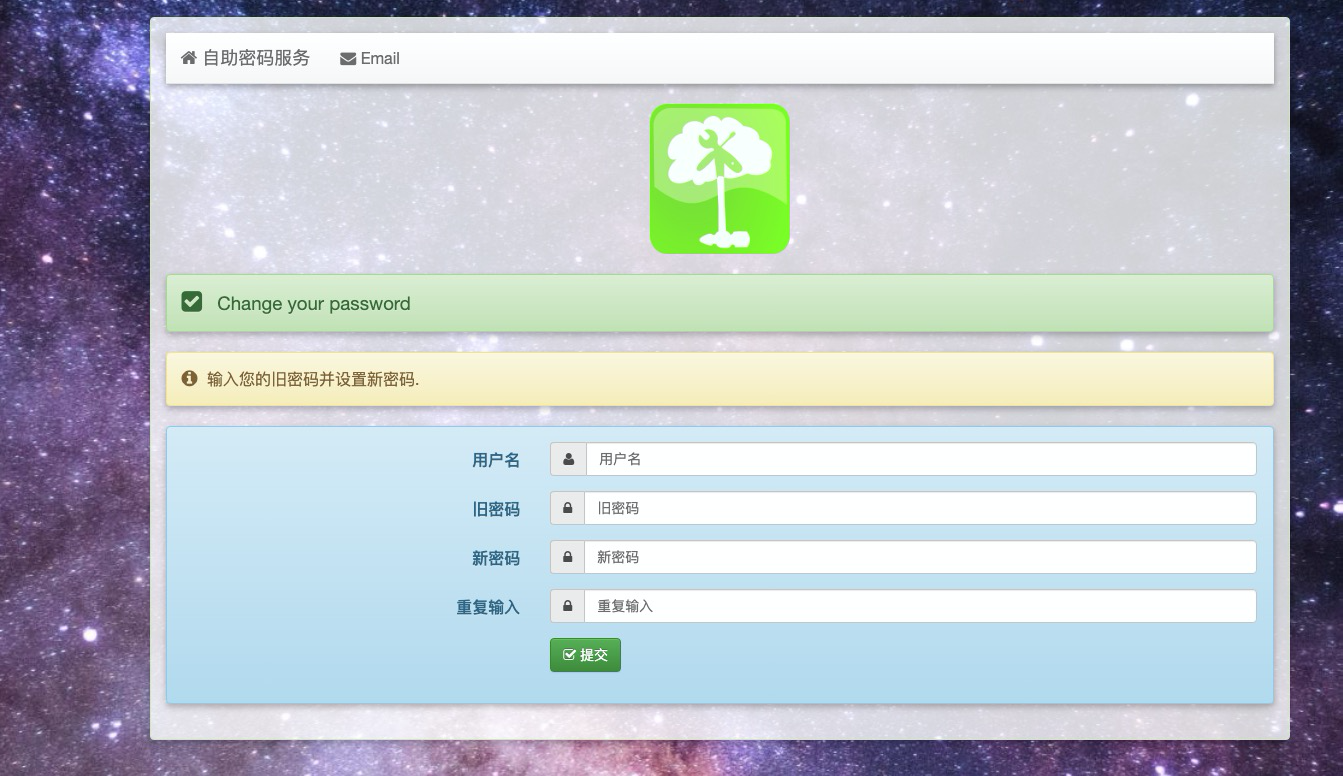
自助 修改密码服务 搭建
 1
 2
 3
 4
 5
 6
 7
 8
 9
10
11
12
13
14
15
16
17
18
19
20
21
22
23
24
25
26
|
docker pull grams/ltb-self-service-password

mkdir -p /etc/ldap-repasswd \
&& cd /etc/ldap-repasswd

wget https://cdn.treesir.pub/application/openldap/config.inc.php

vim config.inc.php  # 修改配置文件中 ldap 信息
$ldap_url = "ldap://192.168.8.1:389";
$ldap_starttls = false;
$ldap_binddn = "cn=admin,dc=treesir,dc=pub";
$ldap_bindpw = "123456";
$ldap_base = "dc=treesir,dc=pub";
$ldap_login_attribute = "uid";
$ldap_fullname_attribute = "cn";
$ldap_filter = "(&(objectClass=person)($ldap_login_attribute={login}))";

# 启动容器
docker run -p 8765:80 -d \
--restart always \
-v /etc/ldap-repasswd/config.inc.php:/usr/share/self-service-password/conf/config.inc.php \
--name ldap-repasswd \
grams/ltb-self-service-password

 # 如开启了 防火墙 需要将 端口 开放出来
firewall-cmd --zone=public --add-port=8765/tcp --permanent && firewall-cmd --reload
|
config.inc.php 配置文件为最基础配置,比如你需要配置 邮件通知 及 密码的安全级别等高级功能请参考详细 文档 。
使用脚本定期备份 ldap 数据
脚本如下所示:
 1
 2
 3
 4
 5
 6
 7
 8
 9
10
11
12
13
14
15
16
17
18
19
20
21
22
23
24
25
26
27
28
29
30
31
32
33
34
35
36
|
#!/bin/bash

##########################################################
# Author        : LeafyJohn
# Email         : amoaloas@gmail.com
# Last modified : 2020-12-21 10:38:27
# Description   : openLdap backupup
# License: Attribution-NonCommercial 4.0 International
###########################################################

PATH=/usr/local/sbin:/usr/local/bin:/sbin:/bin:/usr/sbin:/usr/bin:/root/bin
export PATH
BACKPATH=/data/rsyncd-backup/openldap
KEEPVERSION=30
function BACK() {
        ldapsearch -x -D "cn=admin,dc=treesir,dc=pub" -w '123456' -b 'dc=treesir,dc=pub' -LLL -H ldap://192.168.8.1 > "${BACKPATH}"/`date +"%Y%m%d"`.ldif
}

function CLEAR() {
        NUB=`ls "$BACKPATH"|wc -l`
        if [ "$NUB" -gt "$KEEPVERSION" ]
        then
                KEEP=`echo "$NUB - $KEEPVERSION"|bc`
                for DEL in `ls "$BACKPATH"|sort -nr 2>&1|tail -n "$KEEP"`
                do
                        rm -rf  "$BACKPATH"/"$DEL"
                done
        fi
}


function main() {
        BACK
        CLEAR
}
main
|
配合 cron 进行定期执行
1
|
0 0 * * 1-5 bash /data/scripts/openldap-backup.sh >/dev/null 2>&1
|
数据恢复还原
数据恢复 此处省略,请此篇 文档
配置服务关联列表
Jenkins
jenkins 配置关联,在此篇 文档 中已有配置说明。
Gitlab
编辑 Gitlab 对应配置文件 gitlab.rb ,在最后面添加如下配置列即可
 1
 2
 3
 4
 5
 6
 7
 8
 9
10
11
12
13
14
15
16
17
18
19
20
21
22
|
gitlab_rails['ldap_enabled'] = true
gitlab_rails['ldap_servers'] = YAML.load <<-'EOS'
    main: # 'main' is the GitLab 'provider ID' of this LDAP server
      label: 'LDAP'
      host: 'treesir.pub'
      port: 389 # usually 636 for SSL
      uid: 'uid' # This should be the attribute, not the value that maps to uid.
      # Examples: 'america\\momo' or 'CN=Gitlab Git,CN=Users,DC=mydomain,DC=com'
      bind_dn: 'cn=admin,dc=treesir,dc=pub'
      password: '123456'
      encryption: 'plain' # "start_tls" or "simple_tls" or "plain"
      active_directory: false
      allow_username_or_email_login: false
      base: 'ou=users,dc=treesir,dc=pub'
      user_filter: ''
      attributes:
        username: ['uid', 'userid', 'sAMAccountName']
        email:    ['mail', 'email', 'userPrincipalName']
        name:       'cn'
        first_name: 'givenName'
        last_name:  'sn'
EOS
|
修改完成后,需要重载 Gitlab 使其配置文件生效, 不执行将导致不会生效。
1
2
3
|
gitlab-ctl reconfigure

gitlab-ctl restart  # 重载配置 后 重启服务器生效
|
Rancher
Nexus
创建ldap 认证
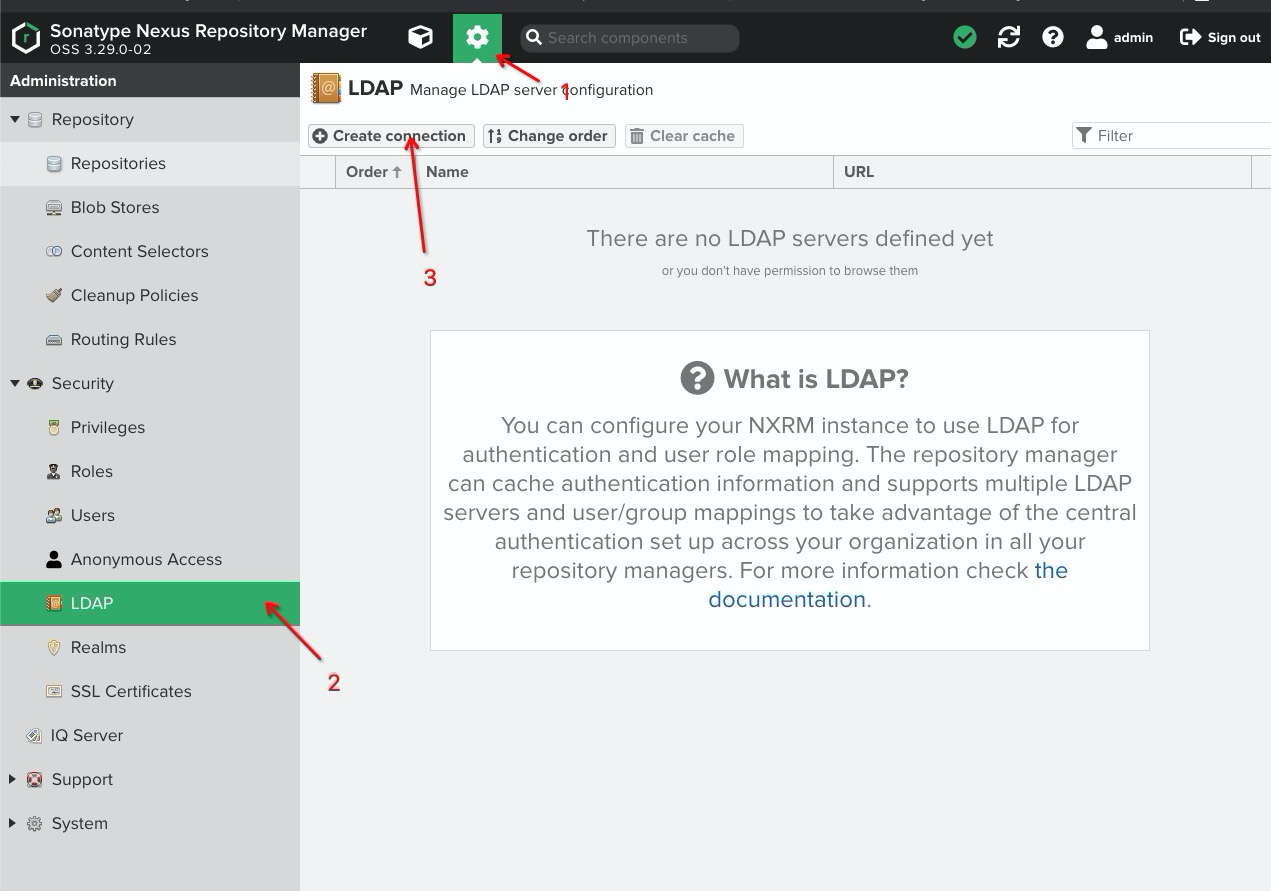
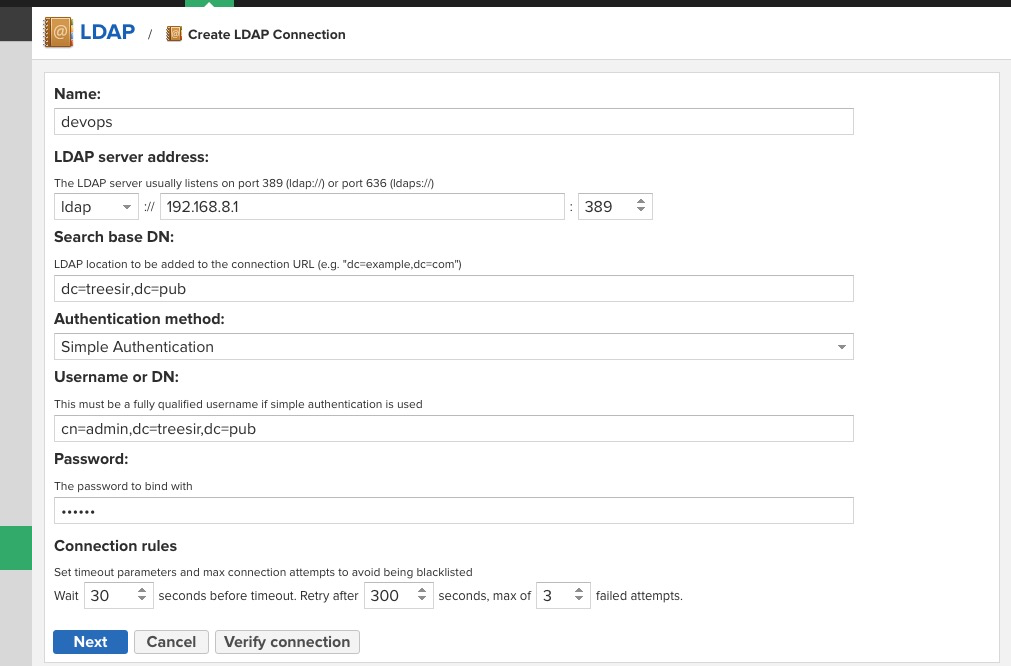
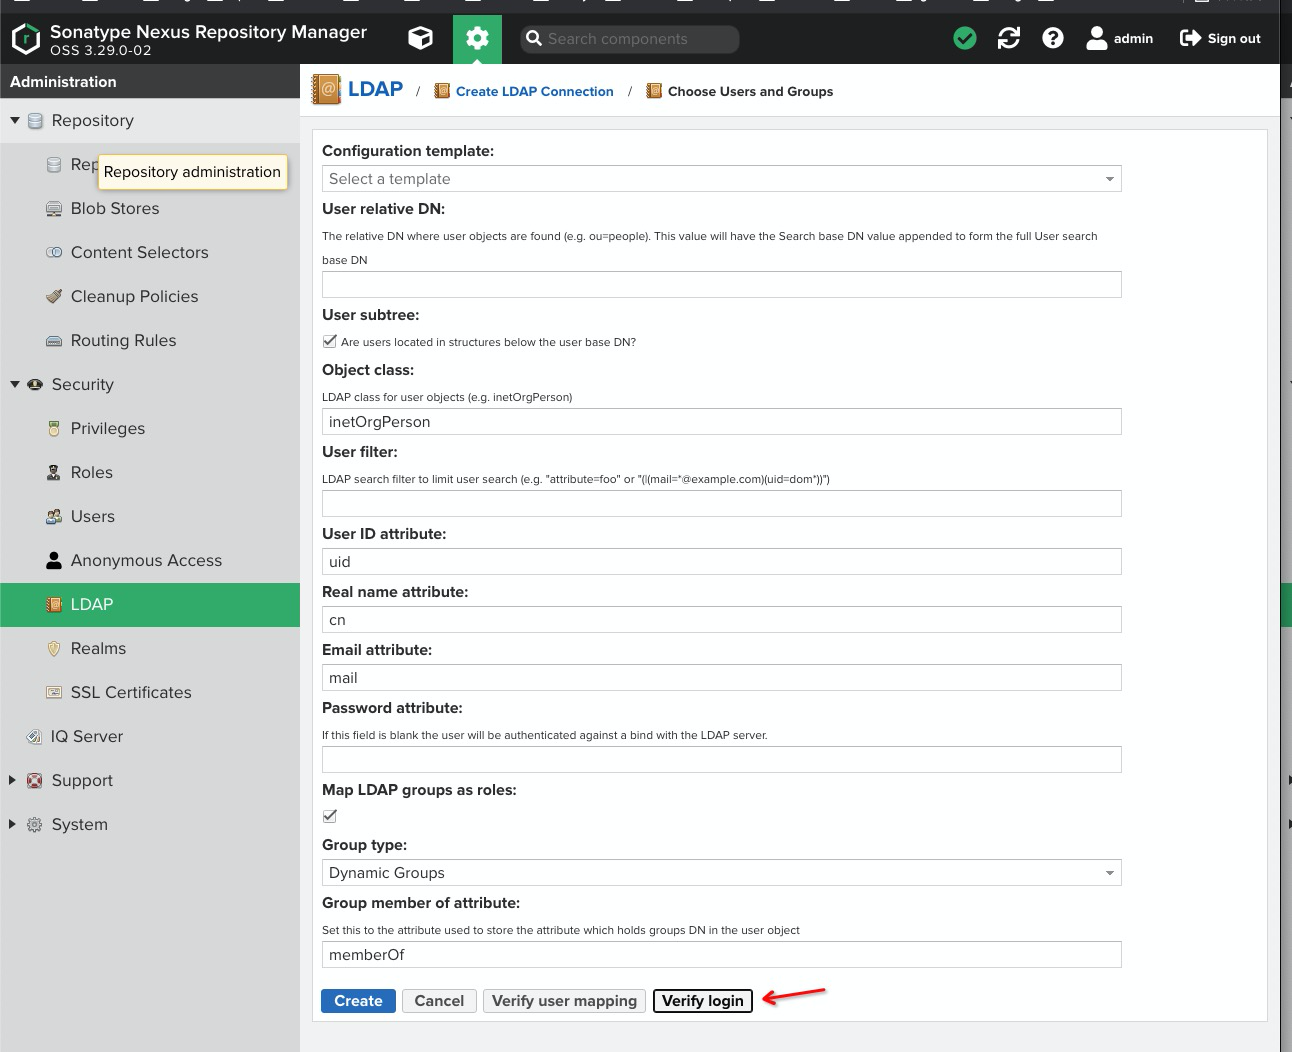
按照上面的配置连接后,记得进行 输入账号测试一下
