站点开始使用 Grafana loki 统计分析
文章目录
说明
建站已接近快三年,一直没有怎么维护和管理,查看站点访问数据目前还使用的是
Google Search Console& 正在对接用的CDN厂商 (又拍云) 所提供的后台统计,又拍云所提供的后台统计有一个痛点,就是无法根据访问IP来统计 PV(Page Views) & UV(Unique Visitors)的真实情况,有点鸡肋。所以开始在网上查找合适轻量化解决方案,对眼上了 Grafana 的这款 Dashboard,查看其简介后,此 Dashboard 基于 Loki 进行实现,能够接入 Grafana Cloud 解决轻量化问题,恰好之前也有对 Loki 有一点了解,部署起来应该问题不大,开始着手探索。
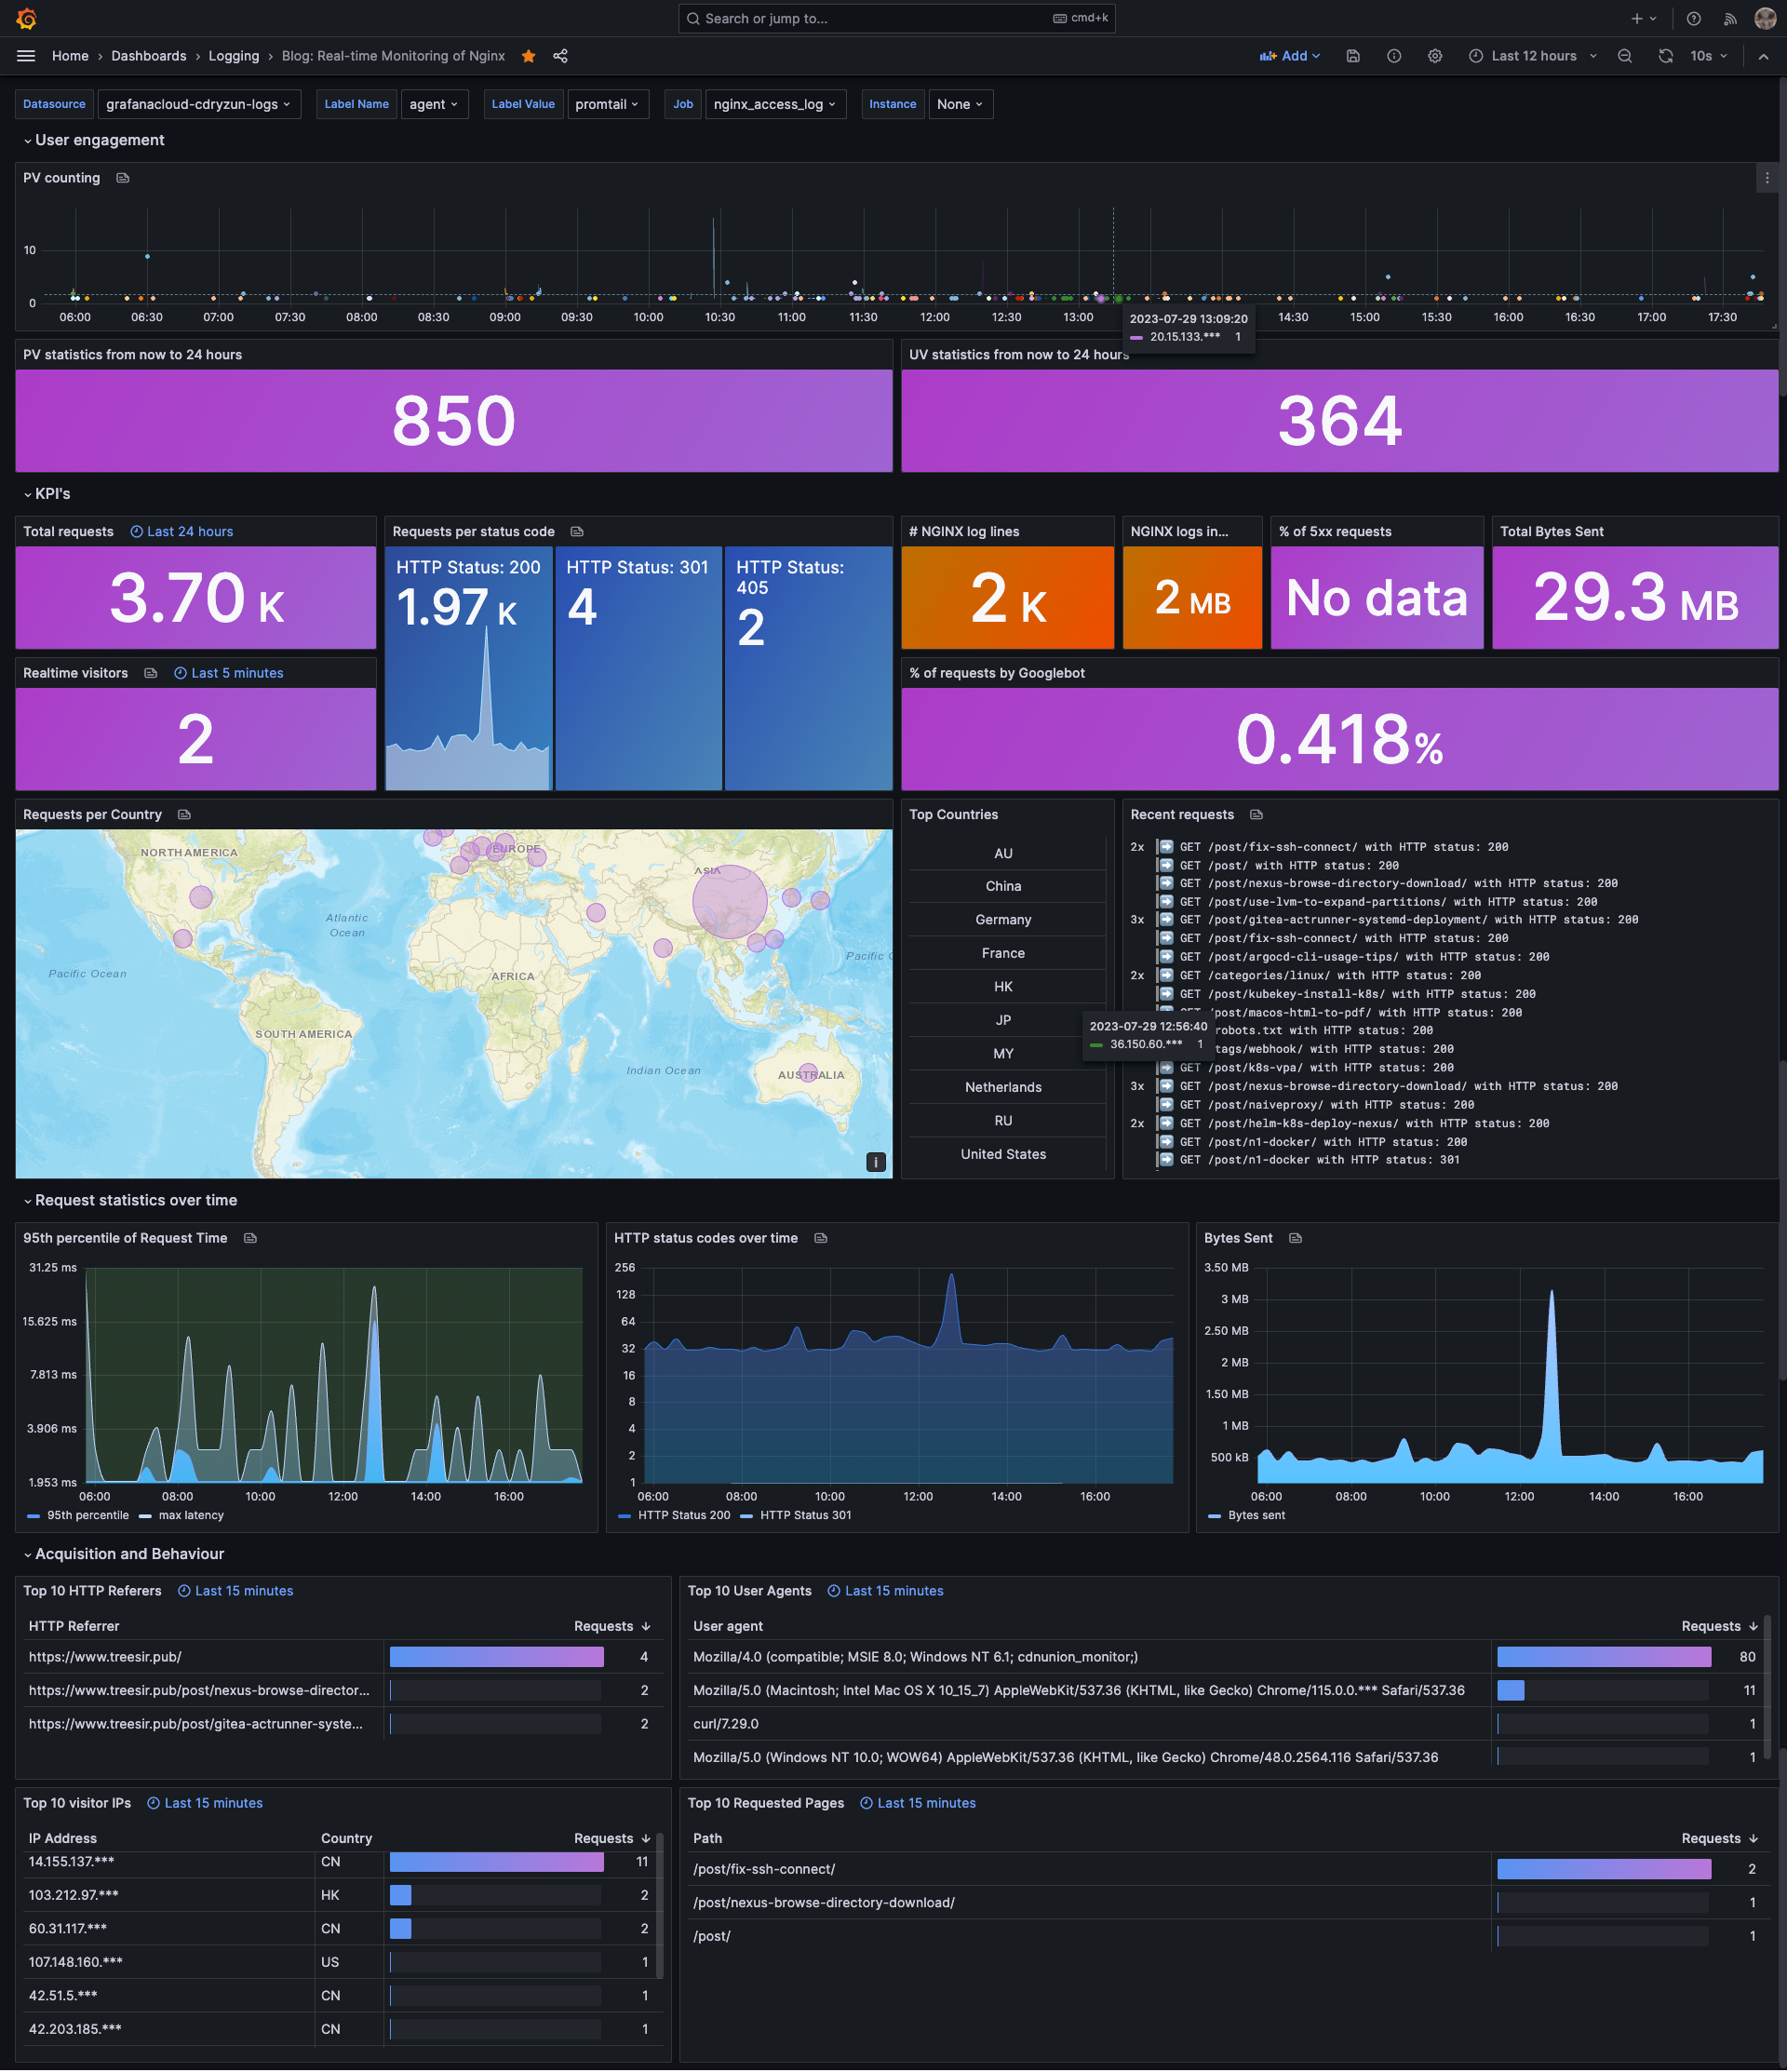
来看一下我最终折腾后的效果,总体还不错的吧
站点情况
开始部署前,先说明一下我站点的技术栈选型,目前我站点基于 Hugo 实现静态文件的生成,将渲染过后的静态文件通过
Docker + Nginx打包成镜像,方便后续接入 K8S 种平台,但后面 K8S 这里我最终放弃,因为站点实际流量不大,没有必要,不适合懒人维护还不环保。而站点实际运行的是在一台云主机中, 使用Docker运行博客容器,再通过 OpenResty 反向代理一下,这里还我套一个 OpenResty 是因为443,这类端口珍贵,通过反代可以实现复用功能,同时还可以加一些 WAF (Web Application Firewall) 的操作使得站点更加的安全、耐操。博客镜像的更新我选择使用的 Watchtower,只要博客的镜像基于 Pipeline 生成最新镜像并推送指 Dockerhub 中,Watchtower 它会自动帮我完成博客的重载和更新。上述描述即是我目前博客的运行情况。
技术说明
-
LoKi 是什么?
Loki 是 Grafana Labs 开发的一个开源、多租户的日志聚合系统,它的设计目标是能够在公有云、私有云和混合云环境中高效地提供即时日志搜索和探索功能。Loki 的设计理念是将日志数据和监控数据(例如,指标和追踪数据)紧密地结合在一起,从而提供一种统一的、高效的方式来观察和诊断系统行为。
Loki 的主要特点包括:
-
索引简化:Loki 不会为每个日志行创建索引,而是为每个日志流创建索引。这种方法大大降低了存储成本,并提高了查询效率。
-
紧密集成 Grafana:Loki 与 Grafana 紧密集成,可以在 Grafana 的界面中直接查询和查看 Loki 的日志数据。
-
多租户支持:Loki 支持多租户,每个租户都有自己的隔离的日志数据。
-
高度可扩展:Loki 的架构支持水平扩展,可以通过添加更多的节点来处理更大的日志数据。
-
兼容 Prometheus:Loki 的查询语言(LogQL)设计上兼容 Prometheus 的查询语言(PromQL),使得在 Loki 中查询日志数据和在 Prometheus 中查询指标数据的体验非常相似。
-
支持多种数据源:Loki 支持多种日志数据源,包括但不限于 systemd journal、docker logs、fluentd 等。
-
-
Loki 的主要组件有哪些?
Loki 的架构由几个主要组件构成,这些组件可以在单个二进制文件中一起运行,也可以作为单独的进程运行。以下是 Loki 的主要组件:
-
Promtail:Promtail 是 Loki 的代理,它负责收集日志并将它们发送到 Loki。Promtail 通常在产生日志的机器上运行,可以直接读取日志文件,也可以接收由其他进程(如 Fluentd 或 Fluent Bit)转发的日志。
-
Loki:Loki 是主要的日志聚合和查询组件,它接收并存储日志,同时提供了一个查询接口。Loki 通过索引日志流(而不是每一行日志)来提供高效的存储和查询。
-
Distributor:Distributor 是 Loki 的组件,它负责接收来自 Promtail 的日志数据,然后将这些数据分发到多个 Ingester。
-
Ingester:Ingester 是 Loki 的组件,它负责接收日志数据,将数据压缩后存储在内存中,然后定期将这些数据刷新到长期存储(如 Amazon S3 或 Google Cloud Storage)。
-
Querier:Querier 是 Loki 的组件,它负责处理来自用户的查询请求。Querier 会从 Ingester 和长期存储中获取数据,然后返回查询结果。
-
Query Frontend:Query Frontend 是 Loki 的组件,它负责优化和加速查询。Query Frontend 会将大查询分解为多个小查询,然后并行执行这些小查询。
-
Compactor:Compactor 是 Loki 的组件,它负责压缩和优化在长期存储中的数据。
-
Ruler:Ruler 是 Loki 的组件,它负责执行预定义的规则和警报。
-
配置日志格式
因我使用的是 OneinStack 一键部署的 OpenRestry,按照该 Dashboard 中的描述,需要对日志配置 GeoIP,需要对 OpenRestry 重新编译开启,查看了一下 GeoIP 的选项,我选择
GeoIP2 Databases作为我的库,只需要编译一下module,在使用时进行 load 即可,对于的 module 地址 & 参考文档
OpenRestry 编译 GeoIP2 模块
-
按照上面文档的描述,首先需要安装 maxminddb 依赖,我这里使用的是
CentOS 7系统,使用下述命令安装1yum install -y libmaxminddb-devel libmaxminddb -
Clone GeoIP2 模块仓库代码至目录 (编译时要用)
1
2
3
mkdir -p /tmp/compile/openresty-$(nginx -v 2>&1|cut -d "/" -f2)/modules cd /tmp/compile/openresty-$(nginx -v 2>&1|cut -d "/" -f2)/modules git clone https://ghproxy.com/https://github.com/leev/ngx_http_geoip2_module.git -
进入 ${NGINX_SOURCE_CODE_PATH} (OpenRestry源码目录) 进行编译,用 OneinStack 安装的话,包会统一存放在
./src目录下我这里
OneinStackROOT_PATH 为/data/scripts/oneinstack,替换为你实际的路径1 2 3 4 5 6 7 8 9 10 11 12 13 14 15# cd ${NGINX_SOURCE_CODE_PATH}/bundle/nginx-$(nginx -v 2>&1|cut -d "/" -f2|grep -oP '^d+.d+.d+') cd /data/scripts/oneinstack/src/openresty-1.19.3.1/bundle/nginx-1.19.3 # 配置编译时所需的环境变量(否则将失败) export LUAJIT_LIB="/usr/local/openresty/luajit/lib/" export LUAJIT_INC="../LuaJIT-*/src/" # 获取已安装的 OpenResty 编译选项,以避免 "二进制不兼容" 错误 COMPILEOPTIONS=$(nginx -V 2>&1|grep -i "arguments"|cut -d ":" -f2-) # 使用这些选项配置编译 # 将 GeoIP2 添加为动态模块,指向你 Clone 的路径 eval ./configure $COMPILEOPTIONS --add-dynamic-module=/tmp/compile/openresty-1.19.3.1/modules/ngx_http_geoip2_module/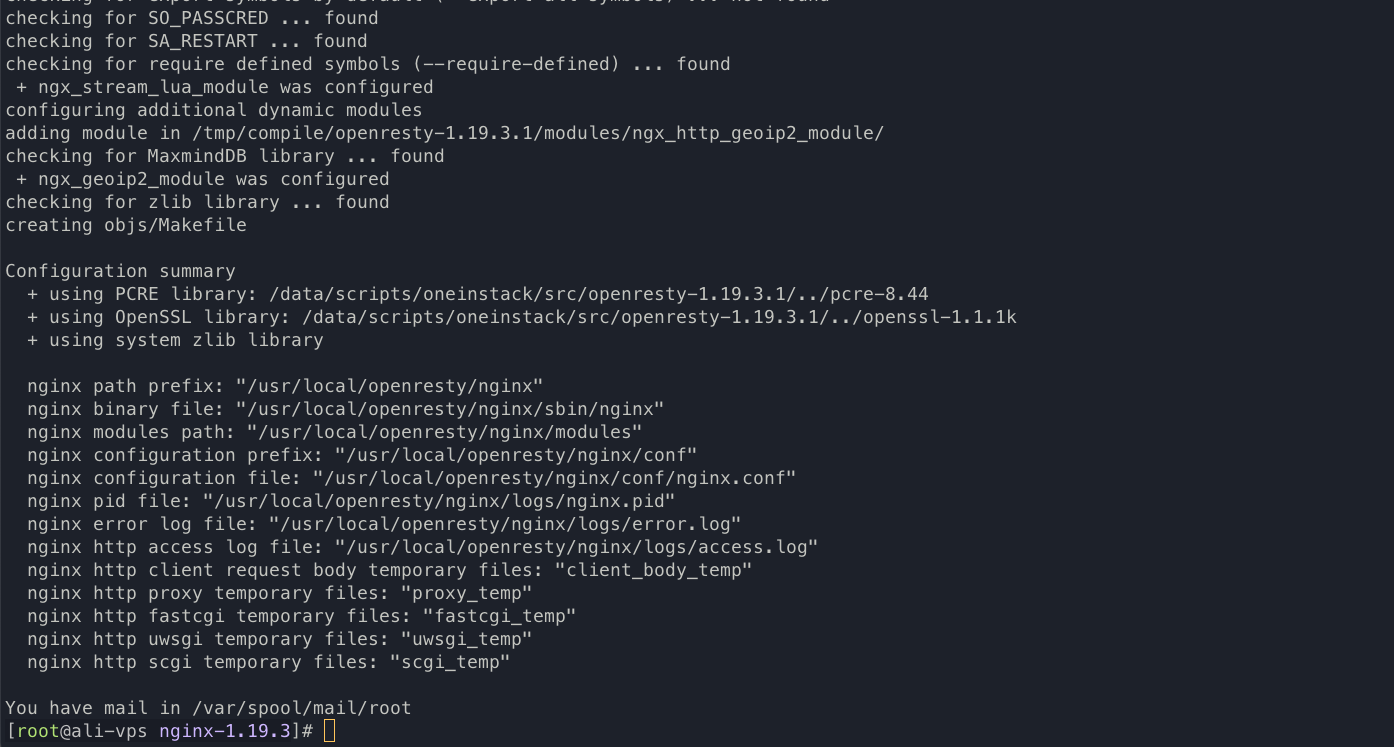
-
上一步成功后,开始执行编译动作
1
2
# Compile just the module make modules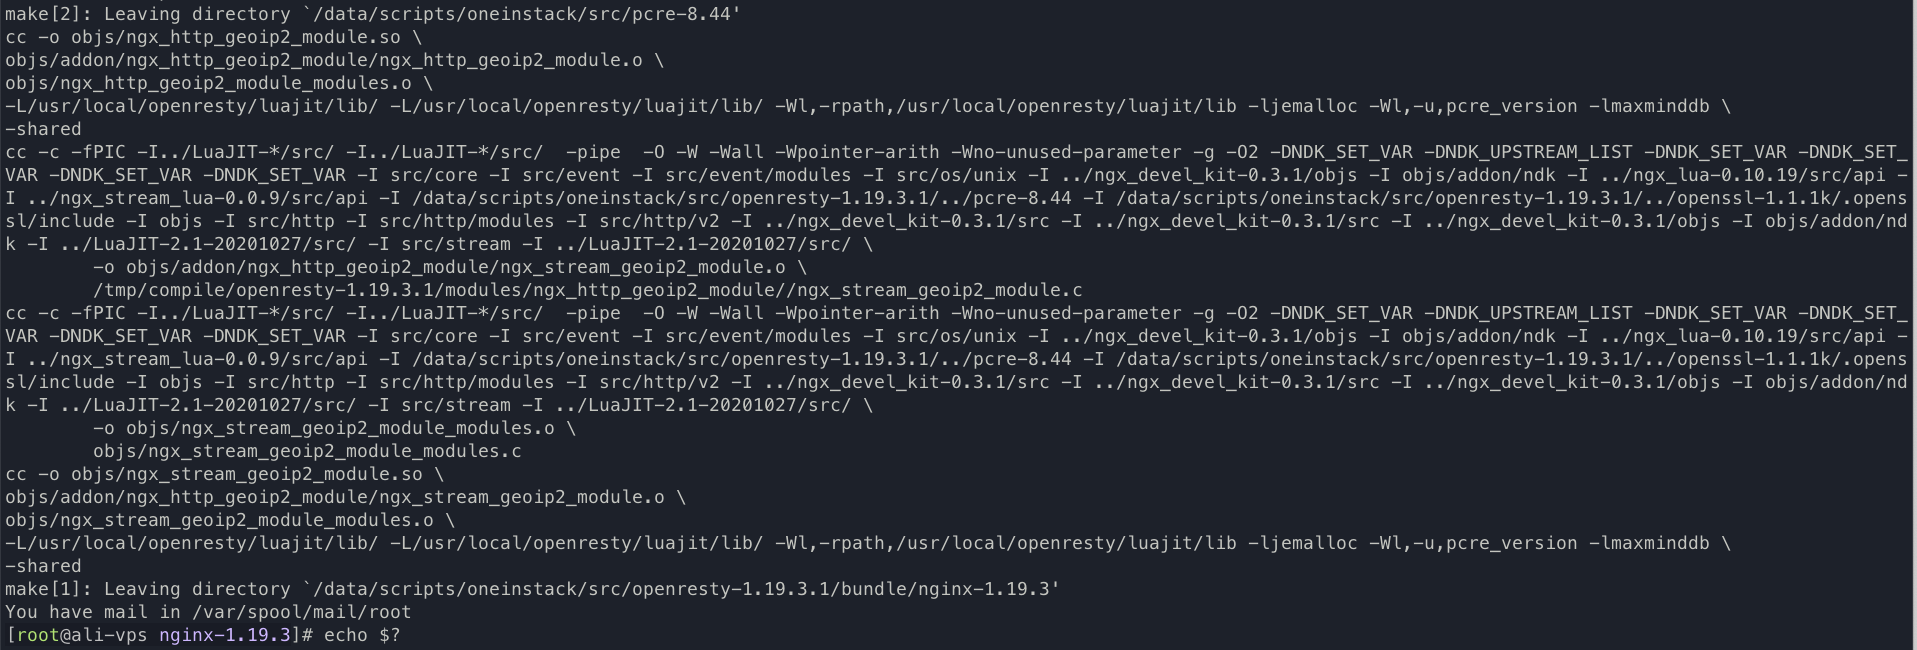
这一步成功后,会在当前
objs下生成 所需的 动态库文件1 2 3ls -lh objs/*.so -rwxr-xr-x 1 root root 86K Jul 27 11:22 objs/ngx_http_geoip2_module.so -rwxr-xr-x 1 root root 62K Jul 27 11:22 objs/ngx_stream_geoip2_module.so # 这个动态库文件为 L4 时使用,我们且用上面那个即可 -
OpenRestry 配置加载 GeoIP2 动态库
1 2 3 4 5 6 7mkdir -p /usr/local/openresty/nginx/modules cp -a objs/*.so /usr/local/openresty/nginx/modules/ # COPY 动态库文件,方便后续引用 vim /etc/nginx/nginx.conf # 编辑 NGINX 主配置文件加入这行 load_module modules/ngx_http_geoip2_module.so;
OpenRestry 配置对接 Geo_IP Databases
模块加载后,实际使用还需要一个 GEO 的数据库,到官网下载到话,需要注册一个账号,有账号的小伙伴可以通过 官网下载,我尝试注册一个提示我使用 VPN 过不了风控,直接给我干劝退。不过还好有其他方案,就是有人以将数据库文件上传至 Github 中,可用仓库地址如下
我下载的
GeoLite2-Country.mmdb,目前已够用
-
下载 geoip2 数据库至
/etc/nginx/geoip2并加载1 2 3 4 5 6 7 8 9 10 11# Nginx 主配置文件加入如下内容,放置到 http 段中 vim /etc/nginx/nginx.conf # Geo_IP geoip2 /etc/nginx/geoip2/GeoLite2-Country.mmdb { auto_reload 5m; $geoip2_metadata_country_build metadata build_epoch; $geoip2_data_country_code default=US country iso_code; $geoip2_data_country_name country names en; }
-
按照 Dashbaord 文档配置日志格式
json_analytics注意
geoip_country_code这里因为我们使用的是 Geo_IP2 ,需要替换为我们上面所定义的变量geoip2_data_country_name1 2 3 4 5 6 7 8 9 10 11 12 13 14 15 16 17 18 19 20 21 22 23 24 25 26 27 28 29 30 31 32 33 34 35 36 37 38 39 40 41 42 43 44vim /etc/nginx/nginx.conf # 添加 Dashboard 所需的日志格式 log_format json_analytics escape=json '{' '"msec": "$msec", ' # request unixtime in seconds with a milliseconds resolution '"connection": "$connection", ' # connection serial number '"connection_requests": "$connection_requests", ' # number of requests made in connection '"pid": "$pid", ' # process pid '"request_id": "$request_id", ' # the unique request id '"request_length": "$request_length", ' # request length (including headers and body) '"remote_addr": "$remote_addr", ' # client IP '"remote_user": "$remote_user", ' # client HTTP username '"remote_port": "$remote_port", ' # client port '"time_local": "$time_local", ' '"time_iso8601": "$time_iso8601", ' # local time in the ISO 8601 standard format '"request": "$request", ' # full path no arguments if the request '"request_uri": "$request_uri", ' # full path and arguments if the request '"args": "$args", ' # args '"status": "$status", ' # response status code '"body_bytes_sent": "$body_bytes_sent", ' # the number of body bytes exclude headers sent to a client '"bytes_sent": "$bytes_sent", ' # the number of bytes sent to a client '"http_referer": "$http_referer", ' # HTTP referer '"http_user_agent": "$http_user_agent", ' # user agent '"http_x_forwarded_for": "$http_x_forwarded_for", ' # http_x_forwarded_for '"http_host": "$http_host", ' # the request Host: header '"server_name": "$server_name", ' # the name of the vhost serving the request '"request_time": "$request_time", ' # request processing time in seconds with msec resolution '"upstream": "$upstream_addr", ' # upstream backend server for proxied requests '"upstream_connect_time": "$upstream_connect_time", ' # upstream handshake time incl. TLS '"upstream_header_time": "$upstream_header_time", ' # time spent receiving upstream headers '"upstream_response_time": "$upstream_response_time", ' # time spend receiving upstream body '"upstream_response_length": "$upstream_response_length", ' # upstream response length '"upstream_cache_status": "$upstream_cache_status", ' # cache HIT/MISS where applicable '"ssl_protocol": "$ssl_protocol", ' # TLS protocol '"ssl_cipher": "$ssl_cipher", ' # TLS cipher '"scheme": "$scheme", ' # http or https '"request_method": "$request_method", ' # request method '"server_protocol": "$server_protocol", ' # request protocol, like HTTP/1.1 or HTTP/2.0 '"pipe": "$pipe", ' # "p" if request was pipelined, "." otherwise '"gzip_ratio": "$gzip_ratio", ' '"http_cf_ray": "$http_cf_ray",' '"geoip_country_code": "$geoip2_data_country_code"' '}'; -
对应虚拟主机日志格式更改
1 2 3 4 5 6 7 8 9# 更改对应虚拟主机中的日志格式,为上面定义的 json_analytics vim vhost/www.conf server { listen 443 http2; server_name www.treesir.pub; access_log /data/wwwlogs/nps_www_access_nginx.log json_analytics; ... }查看效果,以变成我们所期望的格式
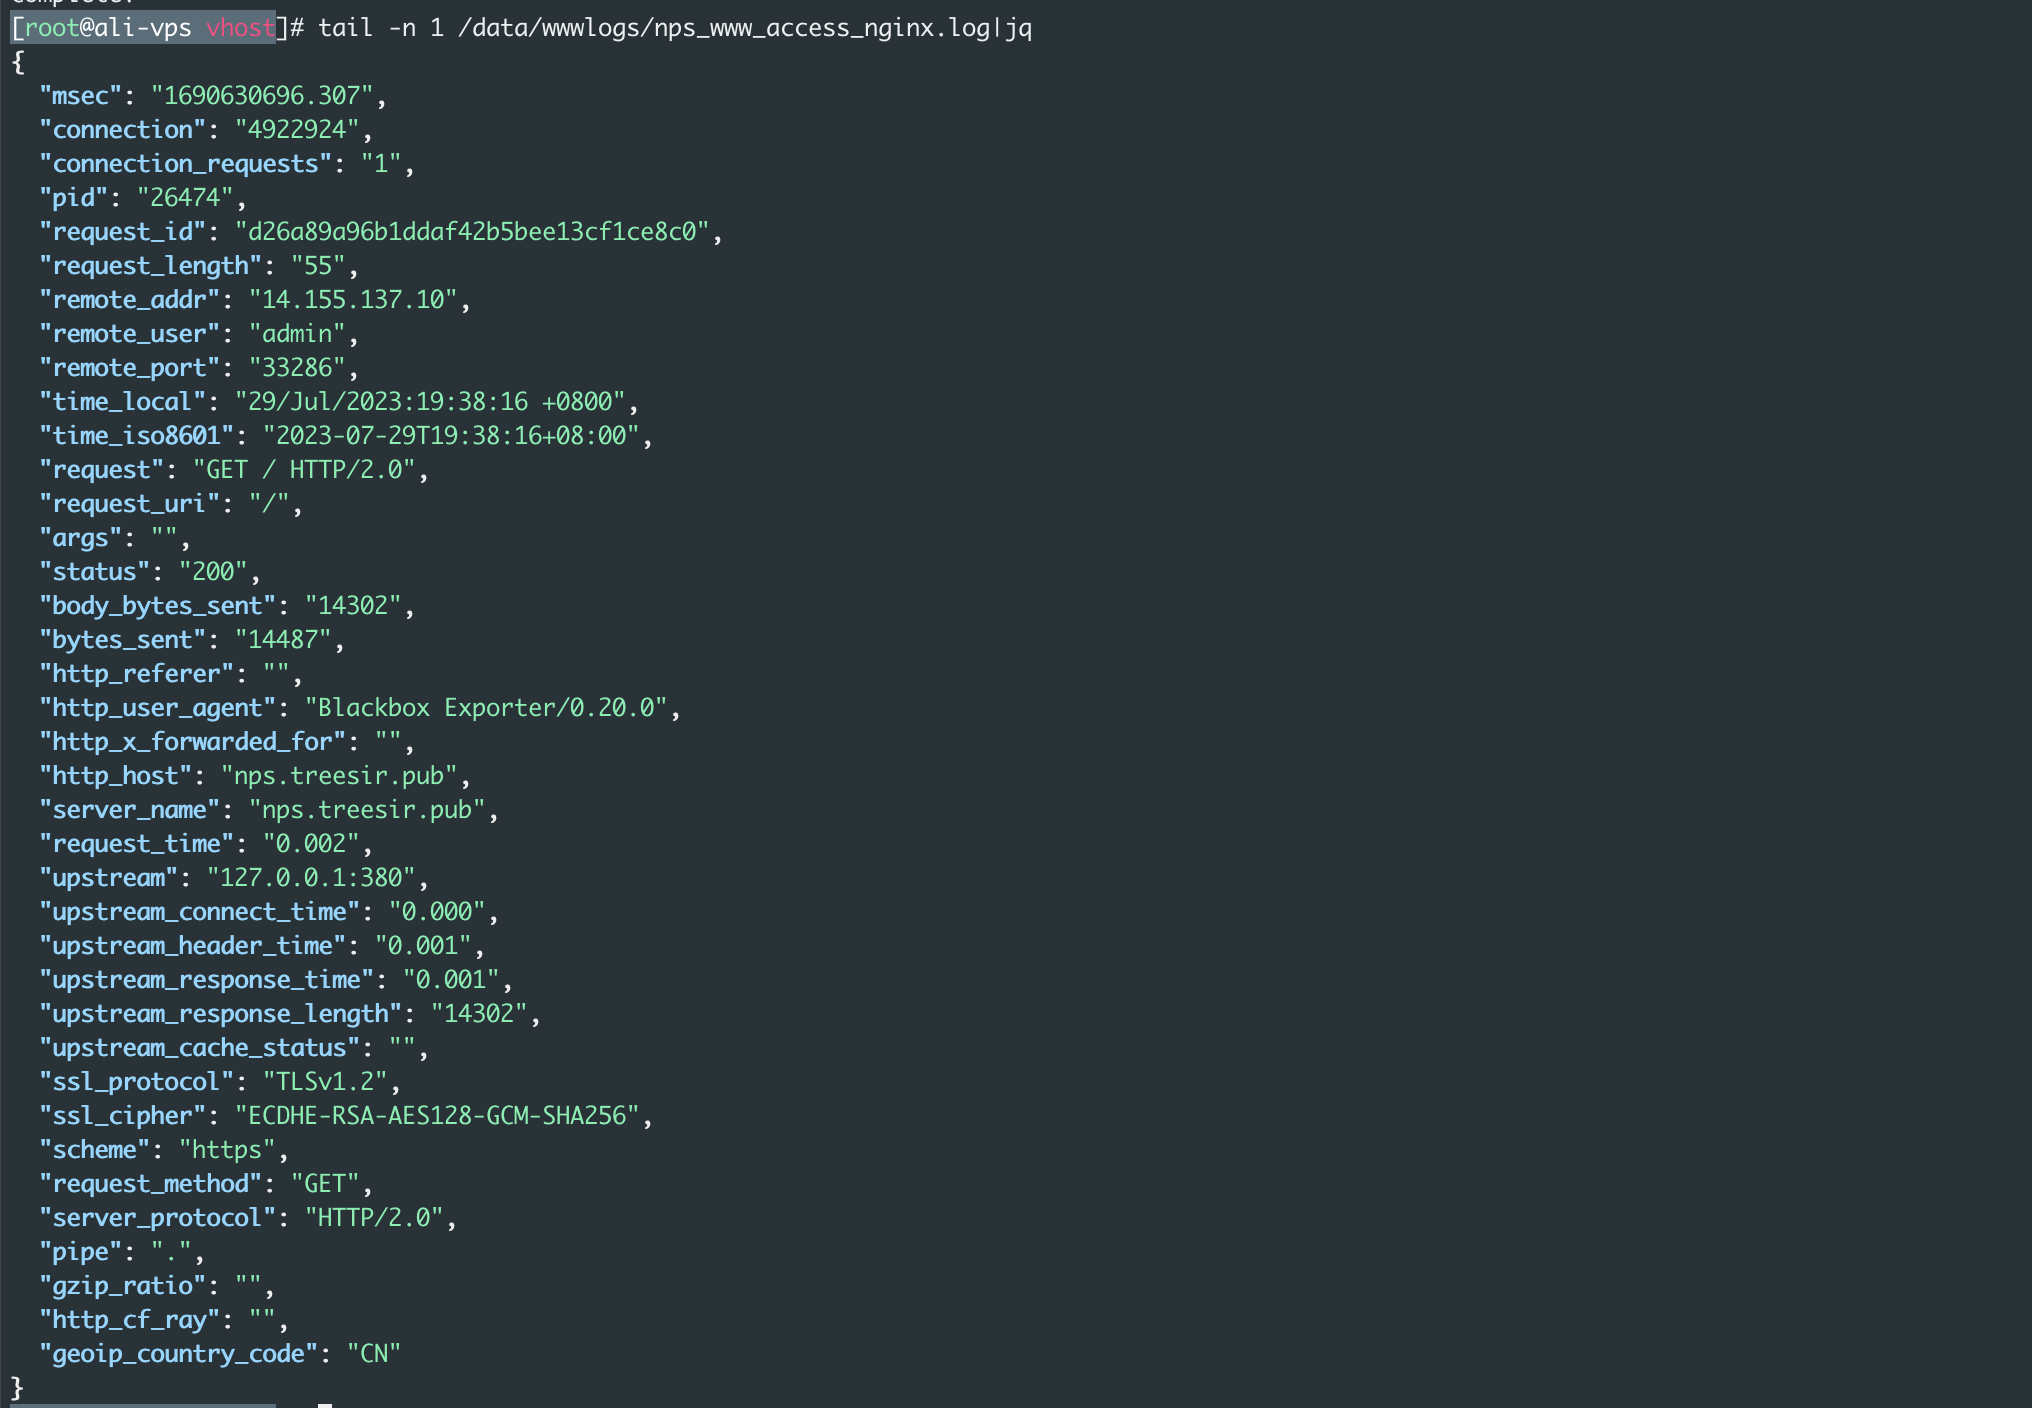
⚠️ 这里日志所返回的
geoip_country_code也有可能不是你所期待的效果,比如你的 站点位于 CDN 或者 代理服务器的后端的时候,会导致remote_addr地址不是真正客户端的真实IP,影响到最终结果,这里概举这两种方式解决- 使用 Nginx 自带的 set_real_ip_from
- 模块提供的 geoip2_proxy 相关参数
推荐 set_real_ip_from 这种,同时可以让日志中
remote_addr也获取到真实的IP,使日志便于后续统计和分析,配置方法如下1 2 3 4 5vim /etc/nginx/nginx.conf # 更改主配置文件,http 段加入如下内容 # 获取 CDN 后真实 IP set_real_ip_from 0.0.0.0/0; real_ip_header X-Forwarded-For;
配置 Loki
由于我比较懒,不太想在自己的
HomeLab中部署 Loki (主要部署单实例的 Loki 使用体验不好,部署微服务架构又太重了,白嫖难道不香嘛?),我们这里基于 Grafana Cloud 实现 Loki 和 Dashboard 的展示。这里省略创建账号这类操作,登陆入口地址如下,有 Google 账号的直接第三方登陆即可
什么是 Grafana Cloud ?
Grafana Cloud 是 Grafana Labs 提供的一种托管服务,它提供了 Grafana、Prometheus 和 Loki 的托管版本。这意味着你可以使用这些强大的开源监控和可视化工具,而无需自己管理和维护底层的基础设施。
以下是 Grafana Cloud 的一些主要特性:
托管的 Grafana:你可以使用最新版本的 Grafana,而无需自己进行安装和升级。
托管的 Prometheus 和 Alertmanager:你可以使用 Prometheus 和 Alertmanager 来收集和管理你的指标数据,而无需自己进行安装和配置。
托管的 Loki:你可以使用 Loki 来收集和查询你的日志数据,而无需自己进行安装和配置。
托管的 Grafana Tempo:Grafana Tempo 是一个高度可扩展的、易于操作的分布式追踪后端。你可以使用它来存储和查询你的追踪数据。
集成的警报和通知:你可以使用 Grafana Cloud 的警报和通知功能,来及时了解你的系统状态。
安全和可靠:Grafana Cloud 提供了数据加密、备份和高可用性等安全和可靠性特性。
部署 Promtail 日志代理
这里的 Promtail 为 Loki 的日志代理,通过将主机中的日志收集起来,Post 到 loki 中,实现日志的统一存储。下面的文档中我们会使用 Docker Compose 来部署
Promtail
-
安装 Docker Compose
以安装请省略
1 2 3 4curl -L "https://github.com/docker/compose/releases/download/1.29.2/docker-compose-$(uname -s)-$(uname -m)" -o /usr/local/bin/docker-compose \ && chmod +x /usr/local/bin/docker-compose \ && ln -s /usr/local/bin/docker-compose /usr/bin/docker-compose \ && docker-compose --version -
初始化 promtail 部署
/data/wwwlogs为你所要收集日志的目录,按你实际情况更改1 2 3 4 5 6 7 8 9 10 11 12 13 14 15 16 17 18 19mkdir -p /data/docker-compose/loki-promtail/ cd /data/docker-compose/loki-promtail/ cat docker-compose.yaml # 内容如下 version: "3" networks: loki: services: promtail: image: grafana/promtail:2.7.4 volumes: - /data/wwwlogs:/data/wwwlogs:ro - ./config/config.yml:/etc/promtail/config.yml:ro - /etc/localtime:/etc/localtime command: -config.file=/etc/promtail/config.ymlconfig/config.yml配置文件如下更改
USER_ID&TOKEN为你实际页面生成的,登陆 Cloud 后找 Loki1 2 3 4 5 6 7 8 9 10 11 12 13 14 15 16 17 18 19 20 21 22 23 24server: http_listen_port: 0 grpc_listen_port: 0 positions: filename: /tmp/positions.yaml clients: - url: https://${USER_ID}:${TOKEN}@logs-prod-021.grafana.net/loki/api/v1/push scrape_configs: - job_name: system pipeline_stages: - replace: expression: '(?:[0-9]{1,3}\.){3}([0-9]{1,3})' replace: '***' static_configs: - targets: - www.treesir.pub labels: job: nginx_access_log host: ali-vps agent: promtail __path__: /data/wwwlogs/nps_www_access_nginx.log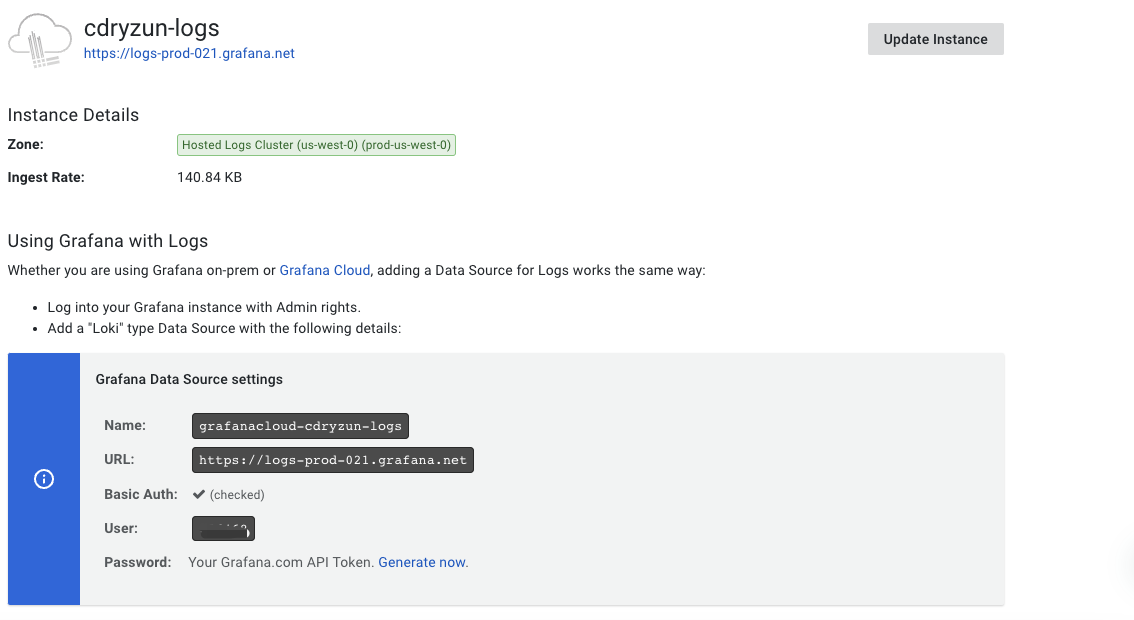
-
启动 promtail 日志收集
1docker-compose up -d
配置 Dashboard
回到 Cloud 主页 ,点击进入 Grafana
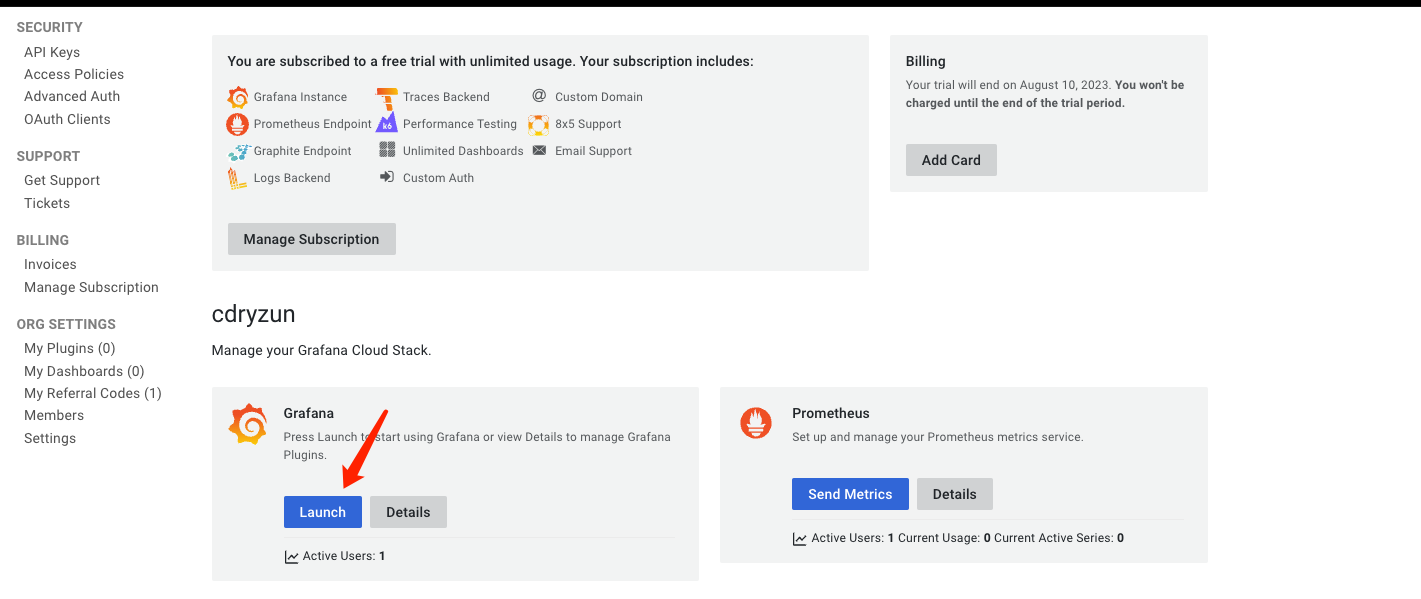
加载 Dashboard


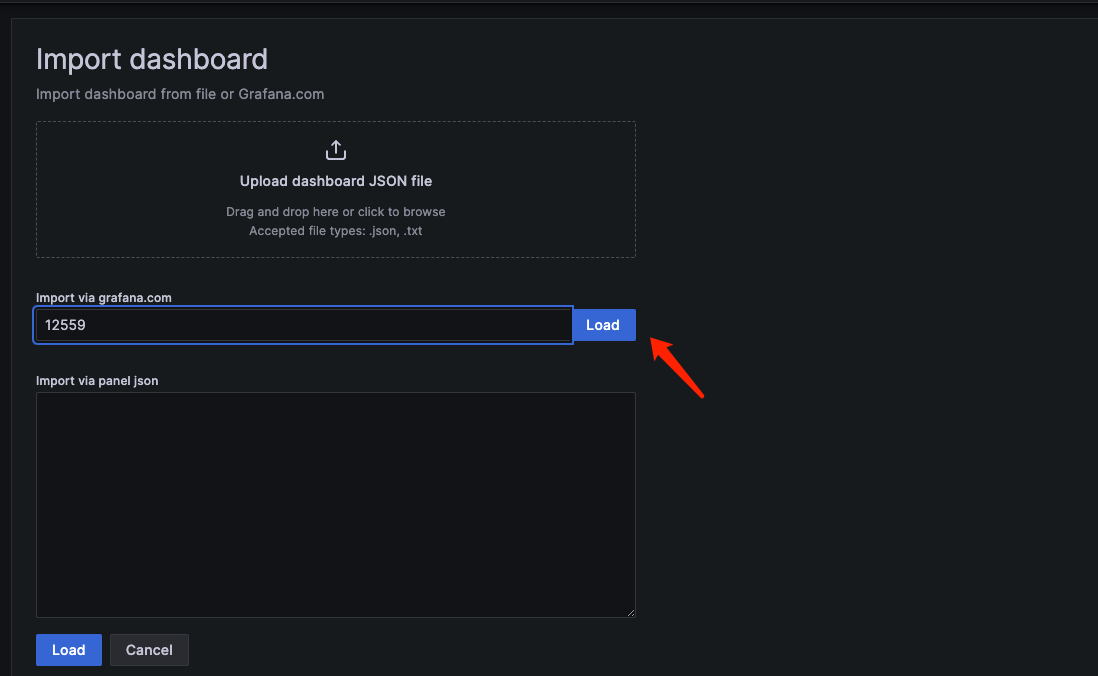
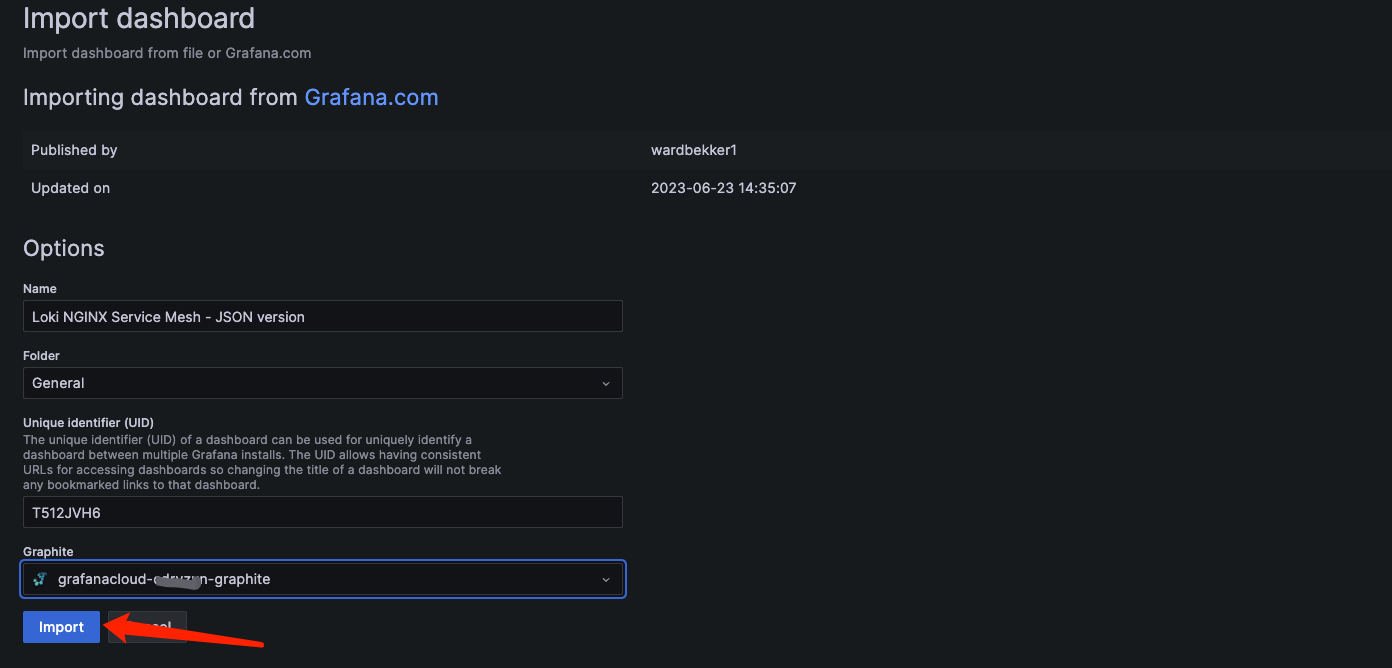
修剪变量 & Dashboard
导入会有一些报错,不用担心,我们调整一下变量即可,是缺少变量导致的


datasource 这里添加过滤 .*-logs,后点击 Apply,防止刷新页面失效,记得点击 Save Dashboard

选择 Dashbaord 参数,就可以看到对应的数值了
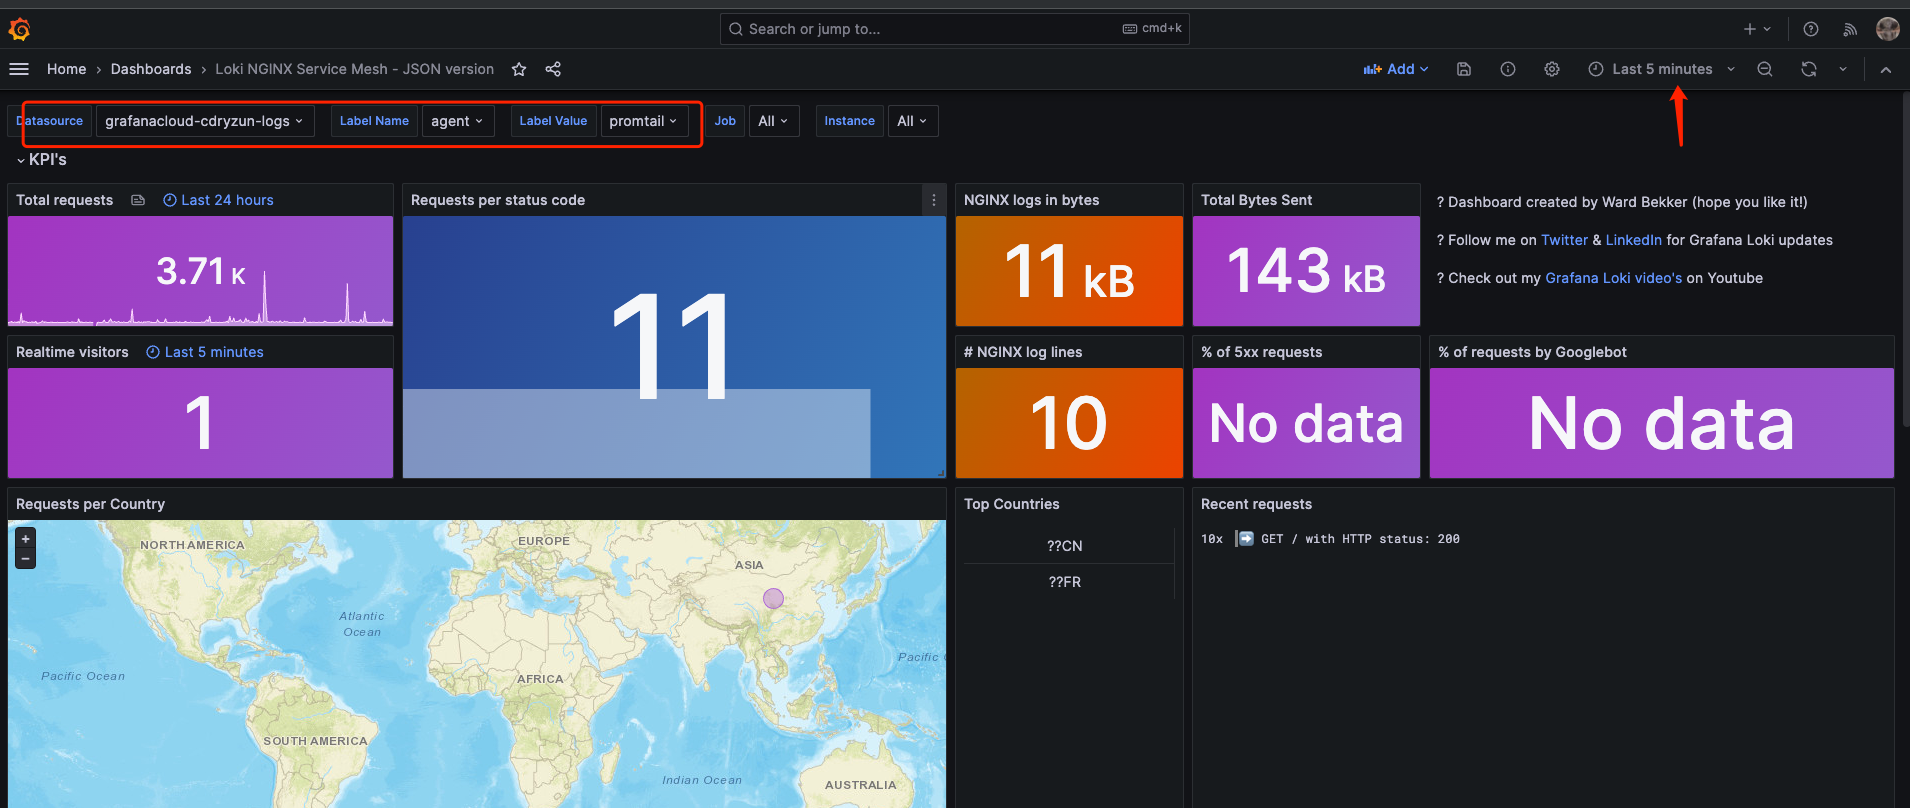
可以看到 Top Countries 这里有点乱码,点击编辑,右边选项栏往下滑,找到 Mapping 把问号删除即可,或者改成你想要的映射内容。
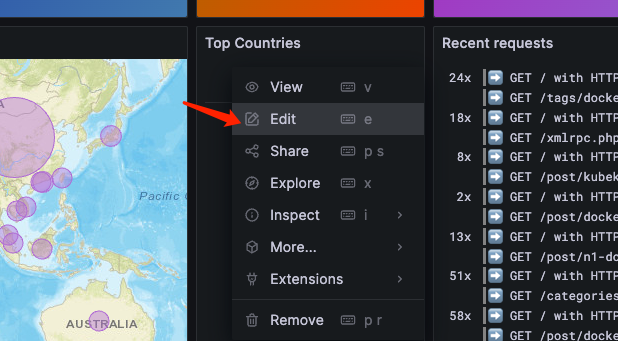
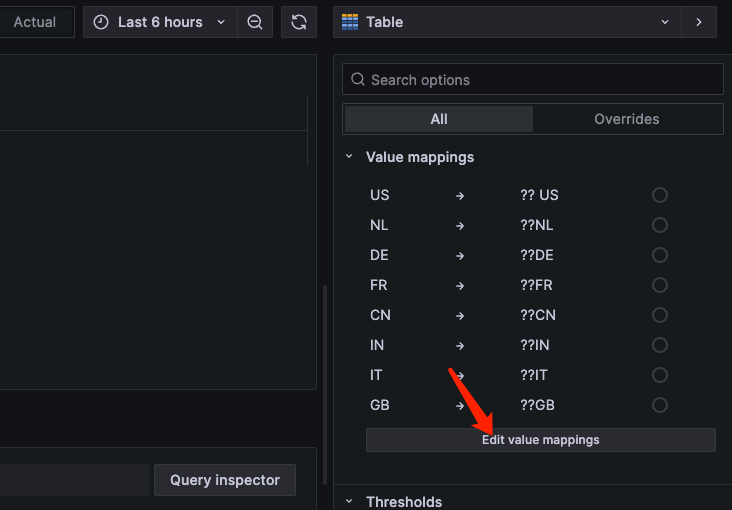
更改后不要忘记 Save 一下

添加 PV & UV 指标
该图表,默认没有提供 PV & UV 指标,Loki 提供了一套与 Prometheus 类似的查询语法,叫 LogQL , 我们可以通过此查询语法,通过自定义 Visualization ,得到我们想要的内容。
-
获取 24H PV 指标, logQL 示例
由于我使用了 Blackbox Exporter 监控探针,避免影响数据的真实性,我这里把这部分请求添加了过滤
1 2 3 4 5 6sum(count_over_time( {job="$job"} | json | __error__="" and remote_addr != "" and http_user_agent !~ "^Blackbox.*" [24h] ))新建图形

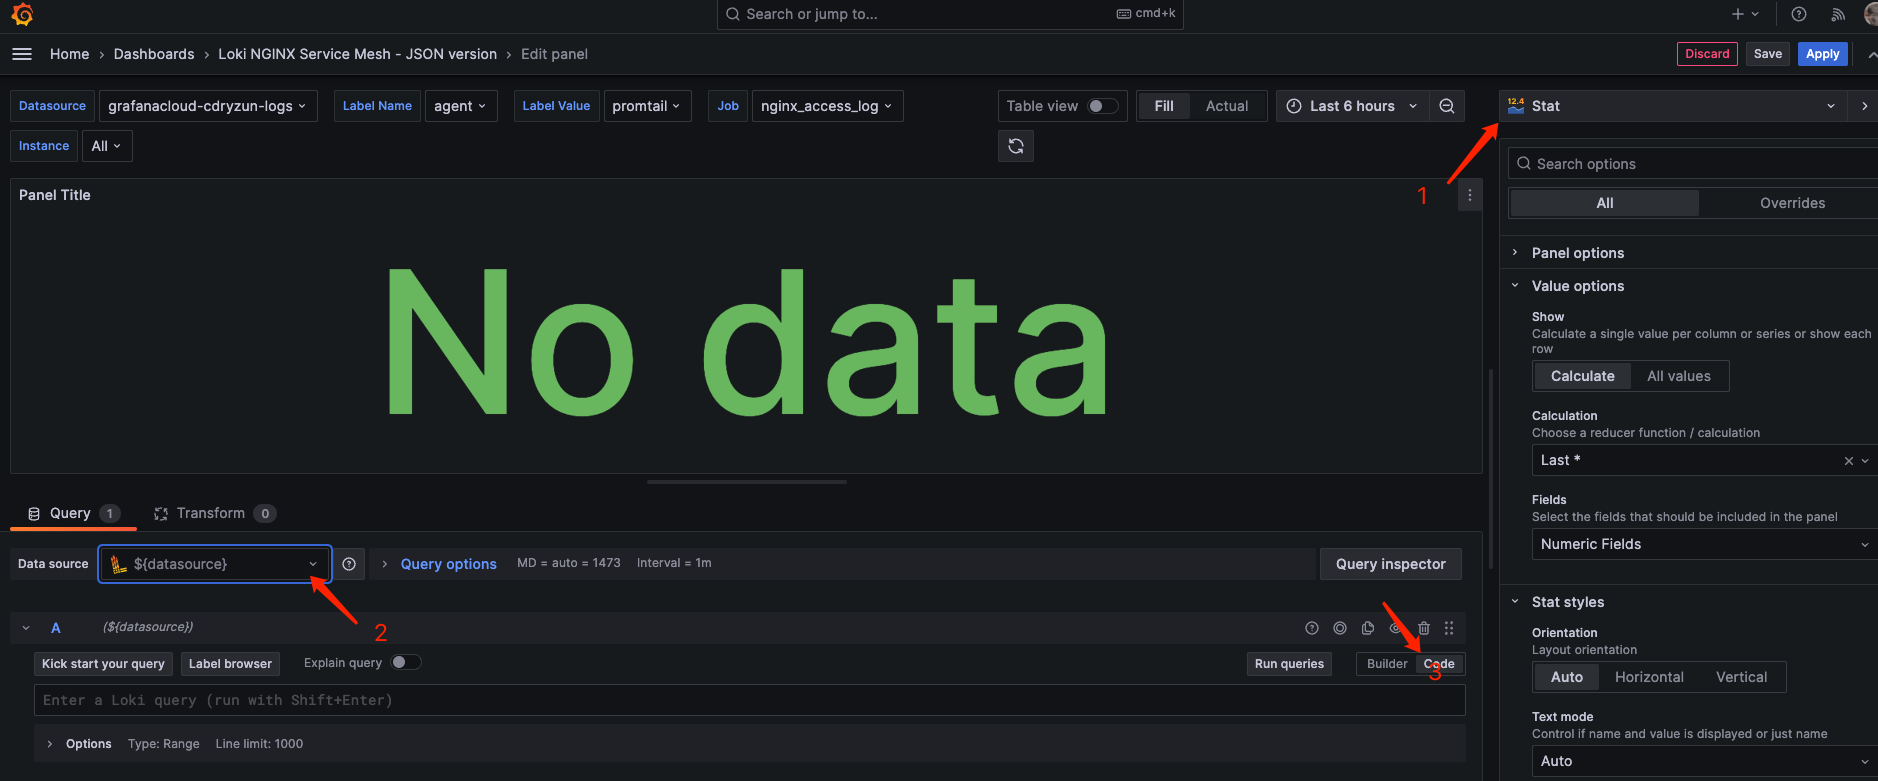
输入 logQL 测试运行,可以看到已经有结果了,由于我们这里且需要基于
现在时间往前推 24h 的 PV 统计,但可以看到下图,它自动查询到了 1473 份数据,并按照这个数据绘制了区间水平线,这其实有点没有必要,我们进行优化一下。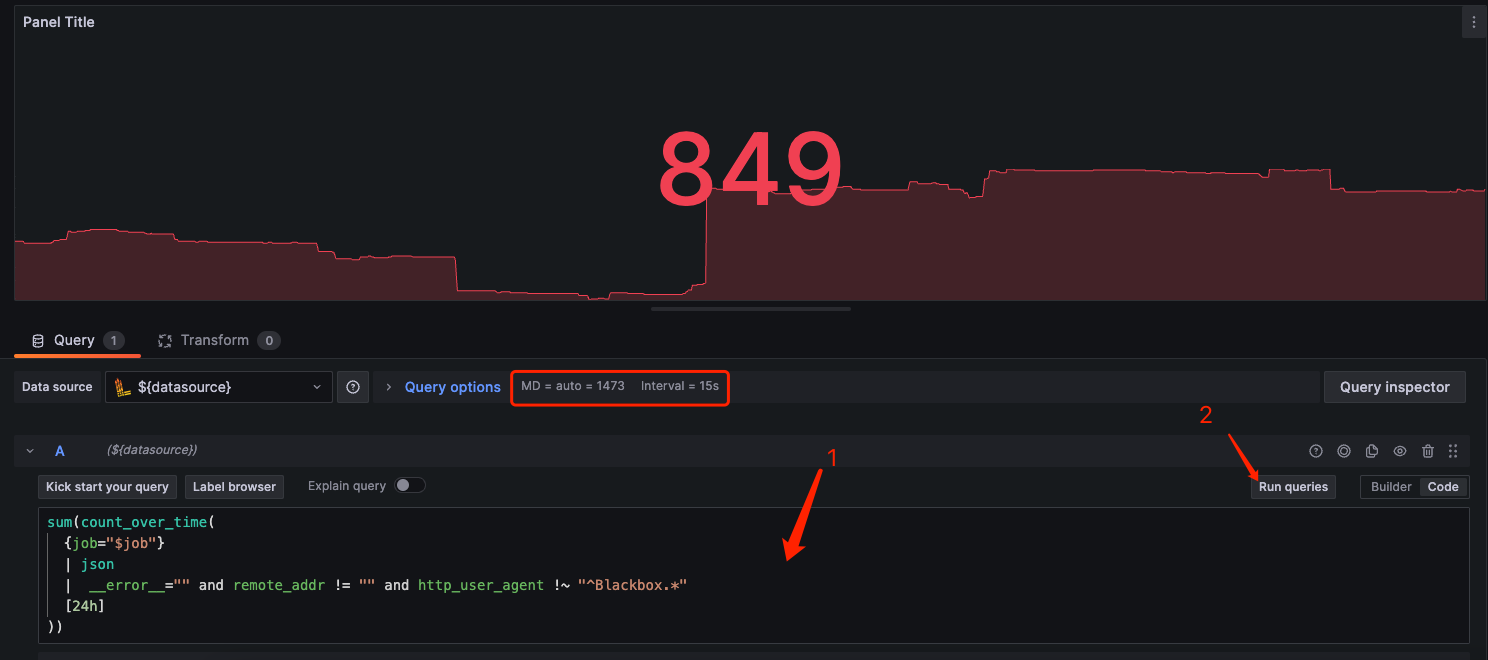
优化查询参数,更改最大查询数据为
1, 时间区间选择15s, 同时隐藏时间信息。这样就得到我们预期的结果了。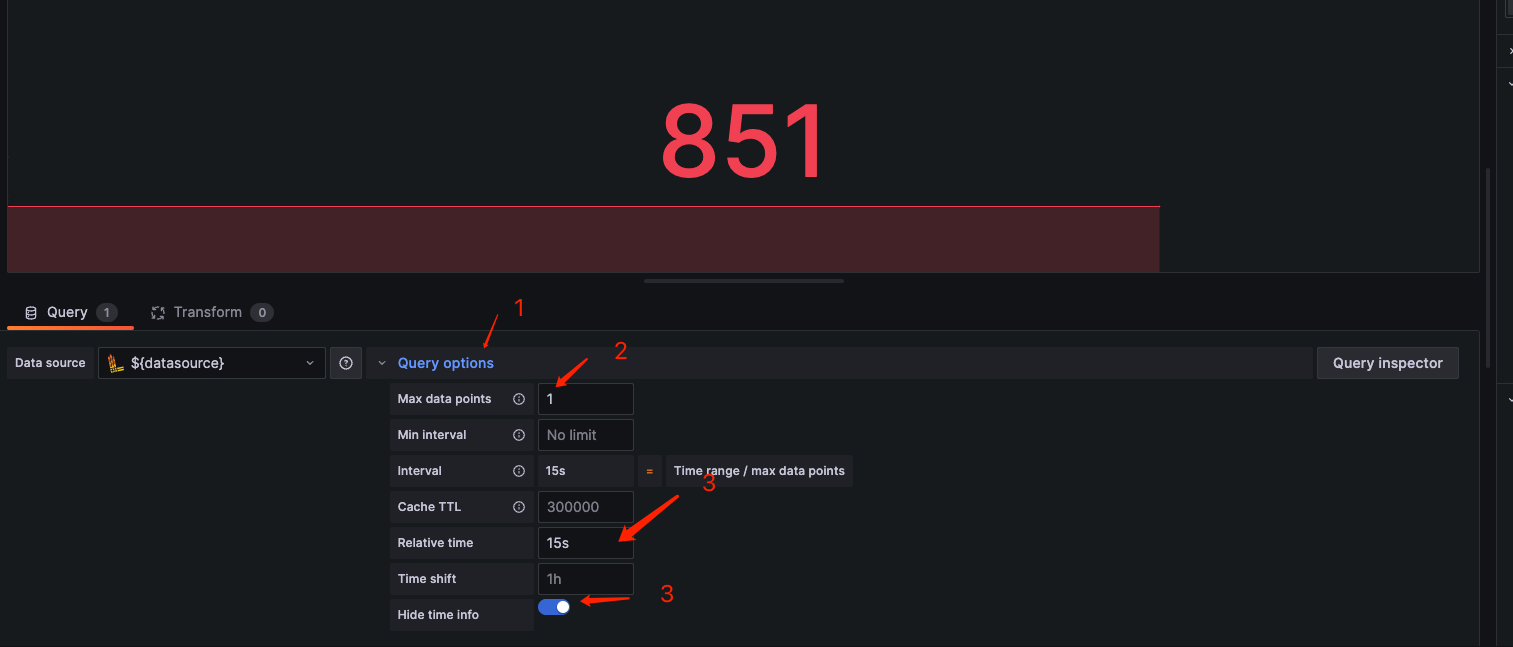
-
获取 24H UV 指标, logQL 示例
配置方法与 上面的 PV 配置一致,如果你想要好看的样式,可以基于现有 Dashbaord 的图表进行参考配置,这部分就由自己的自由发挥,此篇文档不做这里介绍。
1 2 3 4 5 6 7 8 9 10sum(sum by (remote_addr) ( sum by (remote_addr, geoip_country_code) ( count_over_time( {job="$job"} | json | __error__="" and remote_addr != "" and http_user_agent !~ "^Blackbox.*" [24h] ) ) ^ 0 )) -
统计区间PV 增长情况, logQL 示例如下这里的区间我们选择使用
$__interval内置变量,可以在使用时很好的和主页上的区间选择器,进行联动查询。
1 2 3 4 5 6sum by (remote_addr) ((count_over_time( {job="$job"} | json | __error__="" and remote_addr != "" and http_user_agent !~ "^Blackbox.*" [$__interval] )))这次是用到的区间查询,配置方法与上面的两个不一样了,再次点击 New Visualization,选择
Time series类型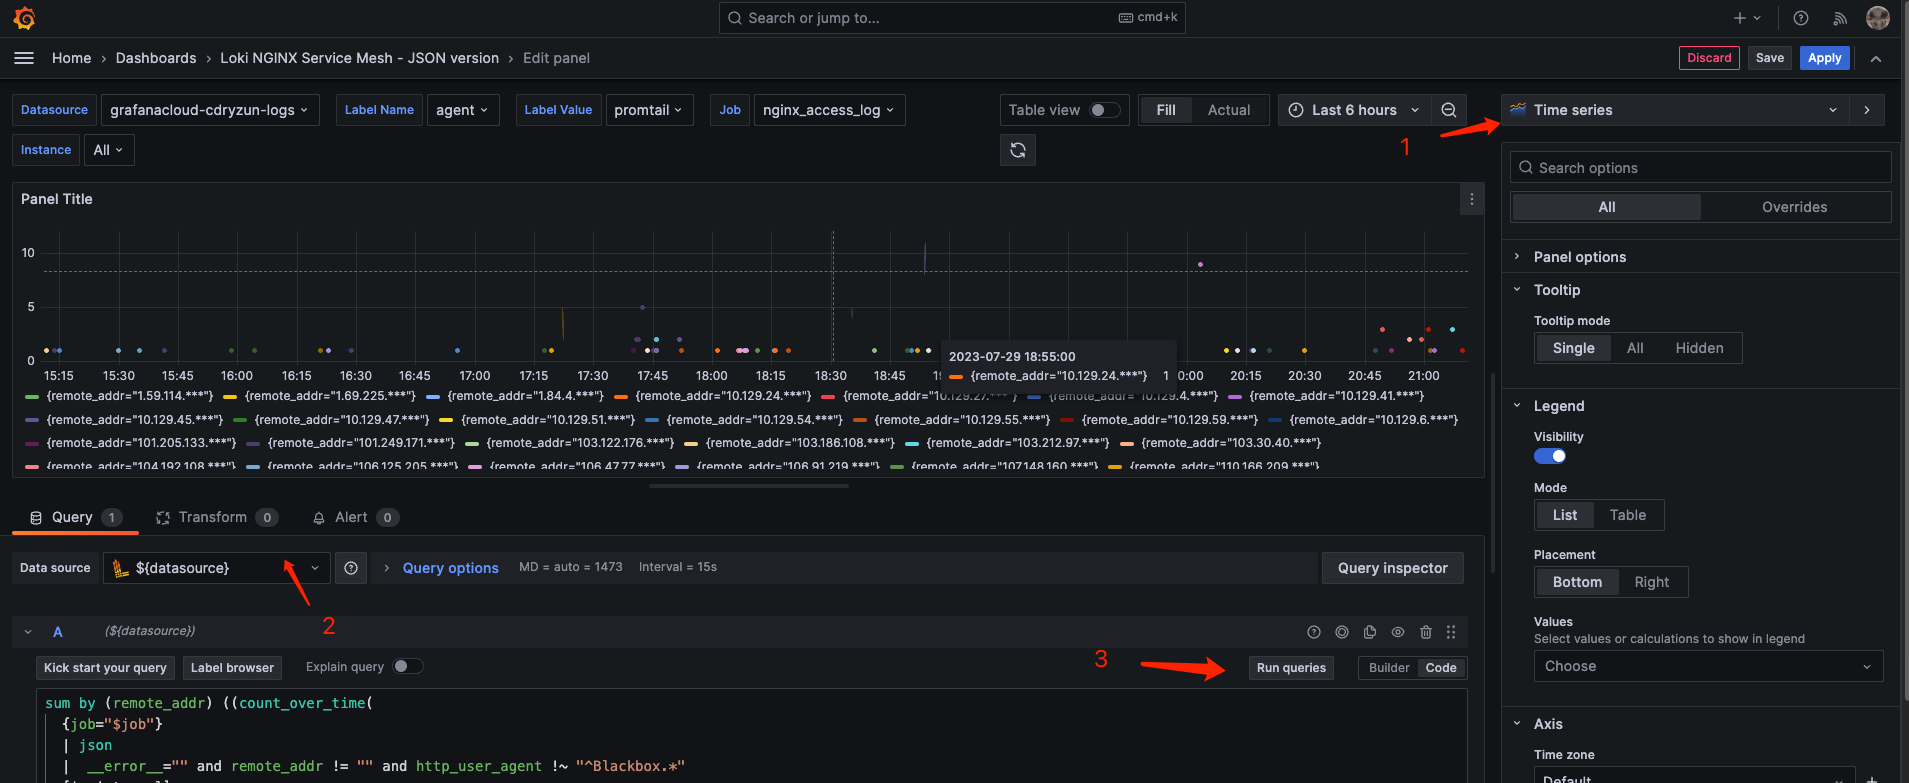
优化显示,现在看这个图,显的有的臃肿,我们优化一下。Legend 这里我们输入
{{remote_addr}}
左边找到
Legend,我们把它的 可见效关掉。现在就看起来舒服多了
最终效果如下。已经与我最初所展示的效果接近。美化的工作交给你自己,如果实在不行,那你参考我这个导出的 Json 文件吧。

总结
Grafana可玩性还是挺高,白嫖的 Grafana Cloud 真香。Grafana Cloud 的查询性能是真不错,我尝试自建 Loki 同时使用 Loki 的微服务模式进行部署,却始终无法达到 Cloud 上的使用体验。后面再做深入研究吧,总体来说使用 Loki 统计博客日志的整体体验还是很不错的,不过经过这次折腾也还有几个问题没有得到有效解决
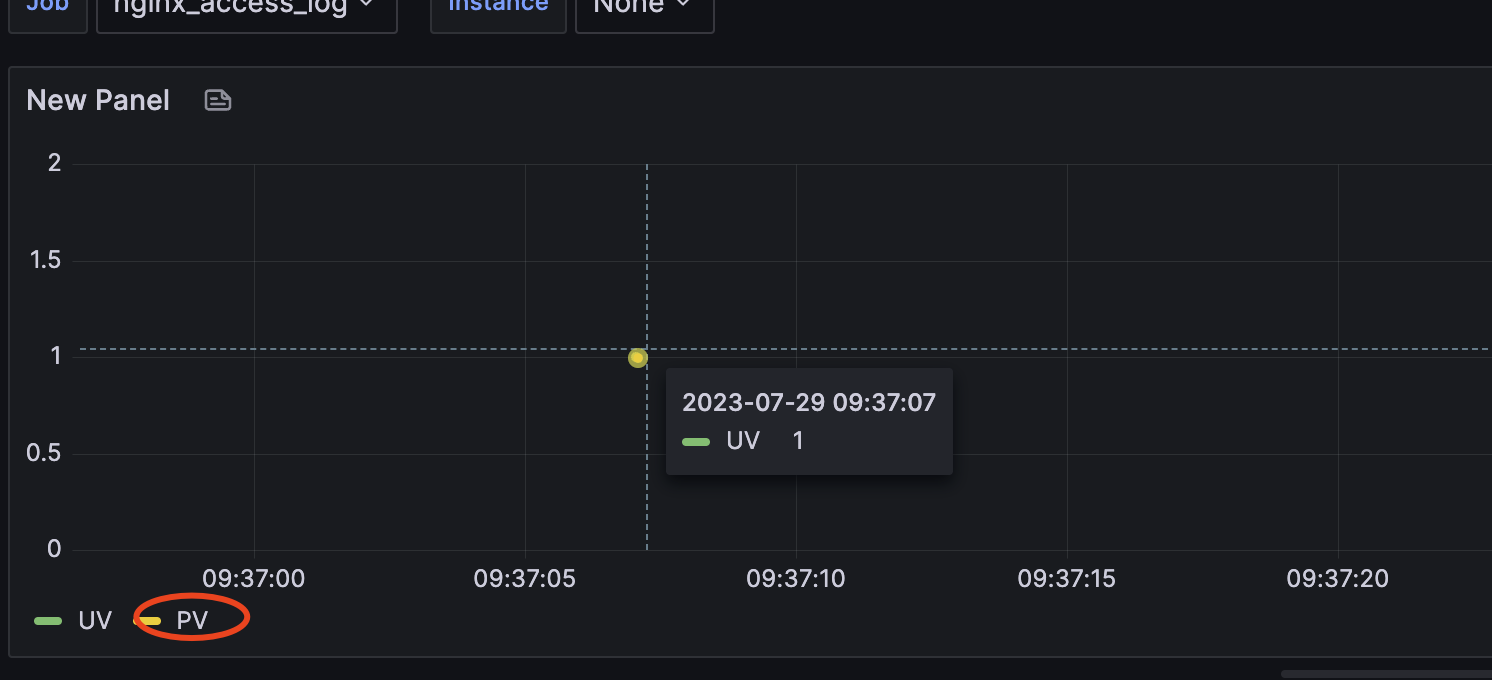
统计 UV 的区间增长指时,这里会得到唯一的 1 ,如果与 PV 同时只有一个时,此处会得到重叠,语法和图片如下
求大佬给个解疑的思路吧
1 2 3 4 5 6 7 8 9 10 11sum(sum by (remote_addr) ( sum by (remote_addr, geoip_country_code) ( count_over_time( {job="$job"} | json | __error__="" and remote_addr != "" and http_user_agent !~ "^Blackbox.*" [24h] ) ) ^ 0 ))
Geo_IP 加载
GeoLite2-City.mmdb库时,无法获取的正确的 City 名称(不过现在也用不着,后面说不定用的找呢)Promtail 打印日志时,时区存在问题,目前且能通过更改源码,通过编译再使用解决
